Login and Dashboard
The Staff Tracker begins with a secure login process, leading to a comprehensive dashboard:
- Easily recover access to your account using the "Forgot Password".
- Enter your registered email address to receive a password reset link.
- Follow the link sent to your email to securely create a new password.
- Ensure your new password meets security requirements for optimal account safety.
-
The dashboard displays real-time
working
hours and efficiency metrics for each employee.
- 1. You can view user statistics in a chart format.
- 2. You can filter dashboard statistics for users by date using the date filter.
- 3. A green dot indicates an active user currently online.
- 4. A red dot signifies a user who is on a break.
- 5. Miscellaneous Options: Additional tools and settings are available for further customization.
- 6. Activity Span: Displays the start and end time of user activity.
- 7. Productivity Rate Bar: Shows the productivity percentage visually.
- 8. Active Work Time: Tracks the total time spent actively working.
- 9. Break Time: Monitors the duration of breaks taken.
- 10. Idle Time: Records the time a user was idle.
- 11. Screenshot Count and Dashboard: Displays the number of screenshots taken along with access to the screenshot dashboard.
-
Miscellaneous Options: Additional
tools and settings are
available for further customization.
- 1. Dashboard Link: Quick access to the main dashboard.
- 2. Online/Offline Users Column: Displays the current online/offline status of users.
- 3. Options Menu: Provides additional actions and settings for users.
- 4. Update Time Value: Allows updating the timer value for past dates.
- 5. View Screenshots: Access links to view user screenshots.
- 6. Edit User Account: Admins can modify user details such as name, email, or role.
- 7. Logout from Everywhere: Admins can remotely log out any user from all devices.
-
The Screenshot Dashboard with
Activity Bar provides a detailed view of user activity,
displaying screenshots.
- 1. Export Screenshot: Admins can export screenshots for a selected date. This feature is exclusive to admins.
- 2. Date Chooser: Admins can select a specific date to view screenshots.
- 3. User Chooser: Allows viewing screenshots for any selected user.
- 4. Apply Filter: Apply selected filters to narrow down the screenshot view.
- 5. Reset Filter: Clear all applied filters to start fresh.
- 6. Last Activity and Screenshot Timestamp: Displays the user's most recent activity and the time of the last screenshot taken.
- 7. Activity Status Bars: Consolidated bars show time intervals for active time, idle time, and break time.
- 8. Delete Screenshot: Admin-only feature to delete selected screenshots.
- 9. Activity Bar: Highlights activity within the screenshot time period for better context.
- 10. Screenshot Card: A detailed summary accompanying each screenshot for quick insights.
User Management
Manage your team effectively with the User section:
- User Dashboard: Manage users from
the dashboard
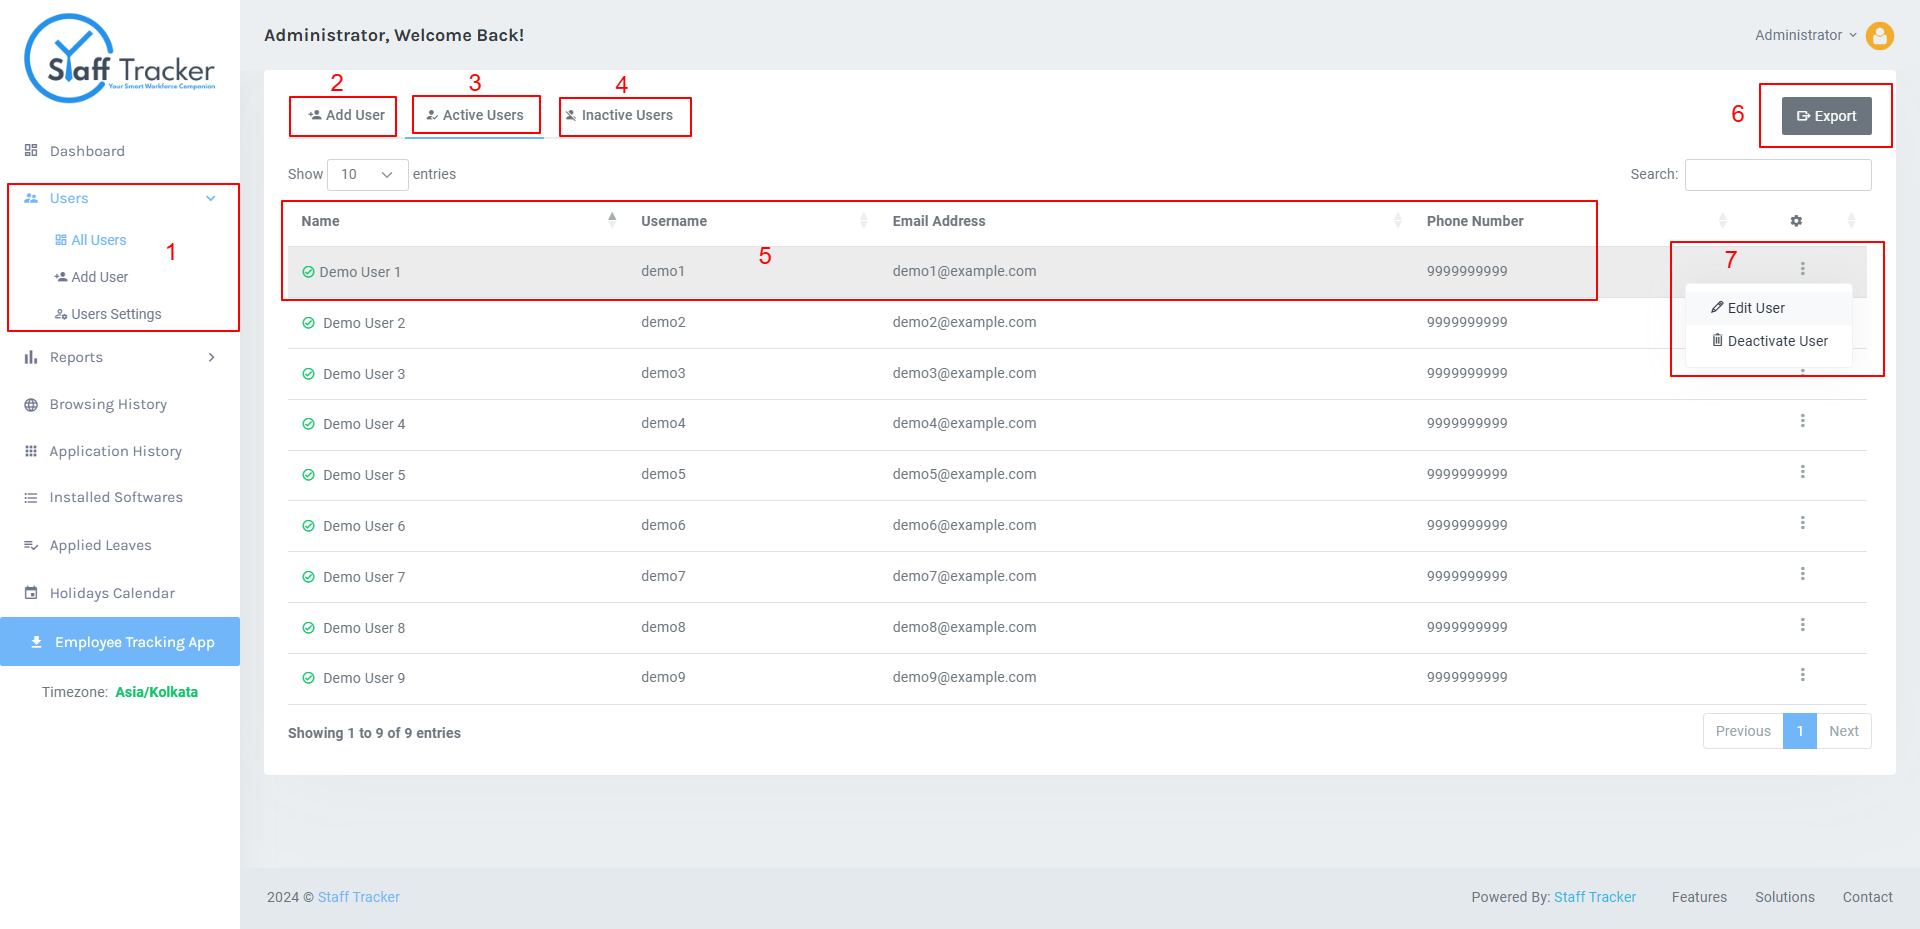
- 1. Users Dashboard Link: Direct link to access the user dashboard.
- 2. Add User: Option to add a new user to the system.
- 3. List of Active Users: Displays users who are currently active.
- 4. List of Inactive Users: Shows users who are not currently active.
- 5. Added User's Details: View detailed information for each user added.
- 6. Export User Details: Admins can export user details to a CSV file.
- 7. User Options: Includes actions like editing user details or deactivating a user.
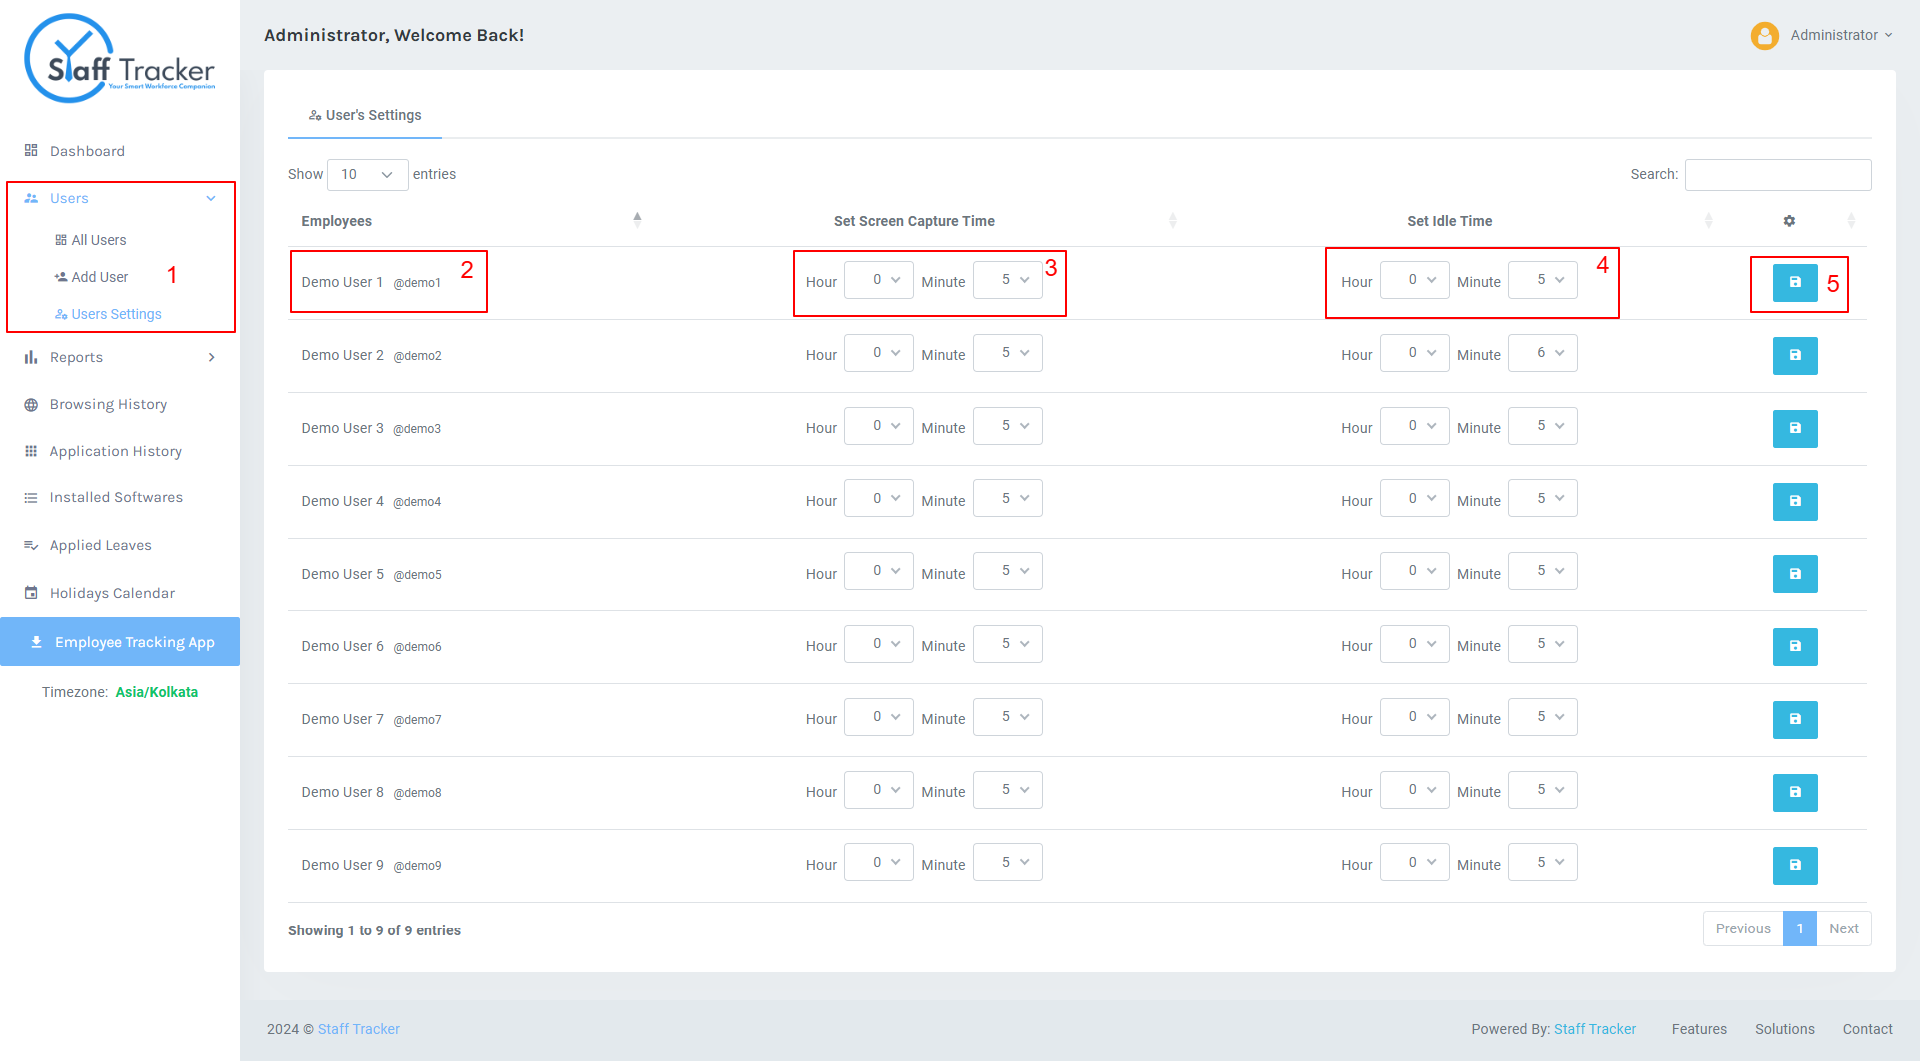
- Automatic screenshots are captured
based on
a timer set to a minimum of every 5 minutes.
- 1. User Settings Page Link: Quick access link to the user settings page.
- 2. User Details: View and edit user information such as name, email, and role.
- 3. Set Automatic Screenshot Capture Time: Configure the interval for automatic screenshot capture for each user.
- 4. Set Idle Capture Time: Set the duration of inactivity before screenshots are captured during idle periods.
- 5. Save Settings Button: Save all changes made to user settings.
-
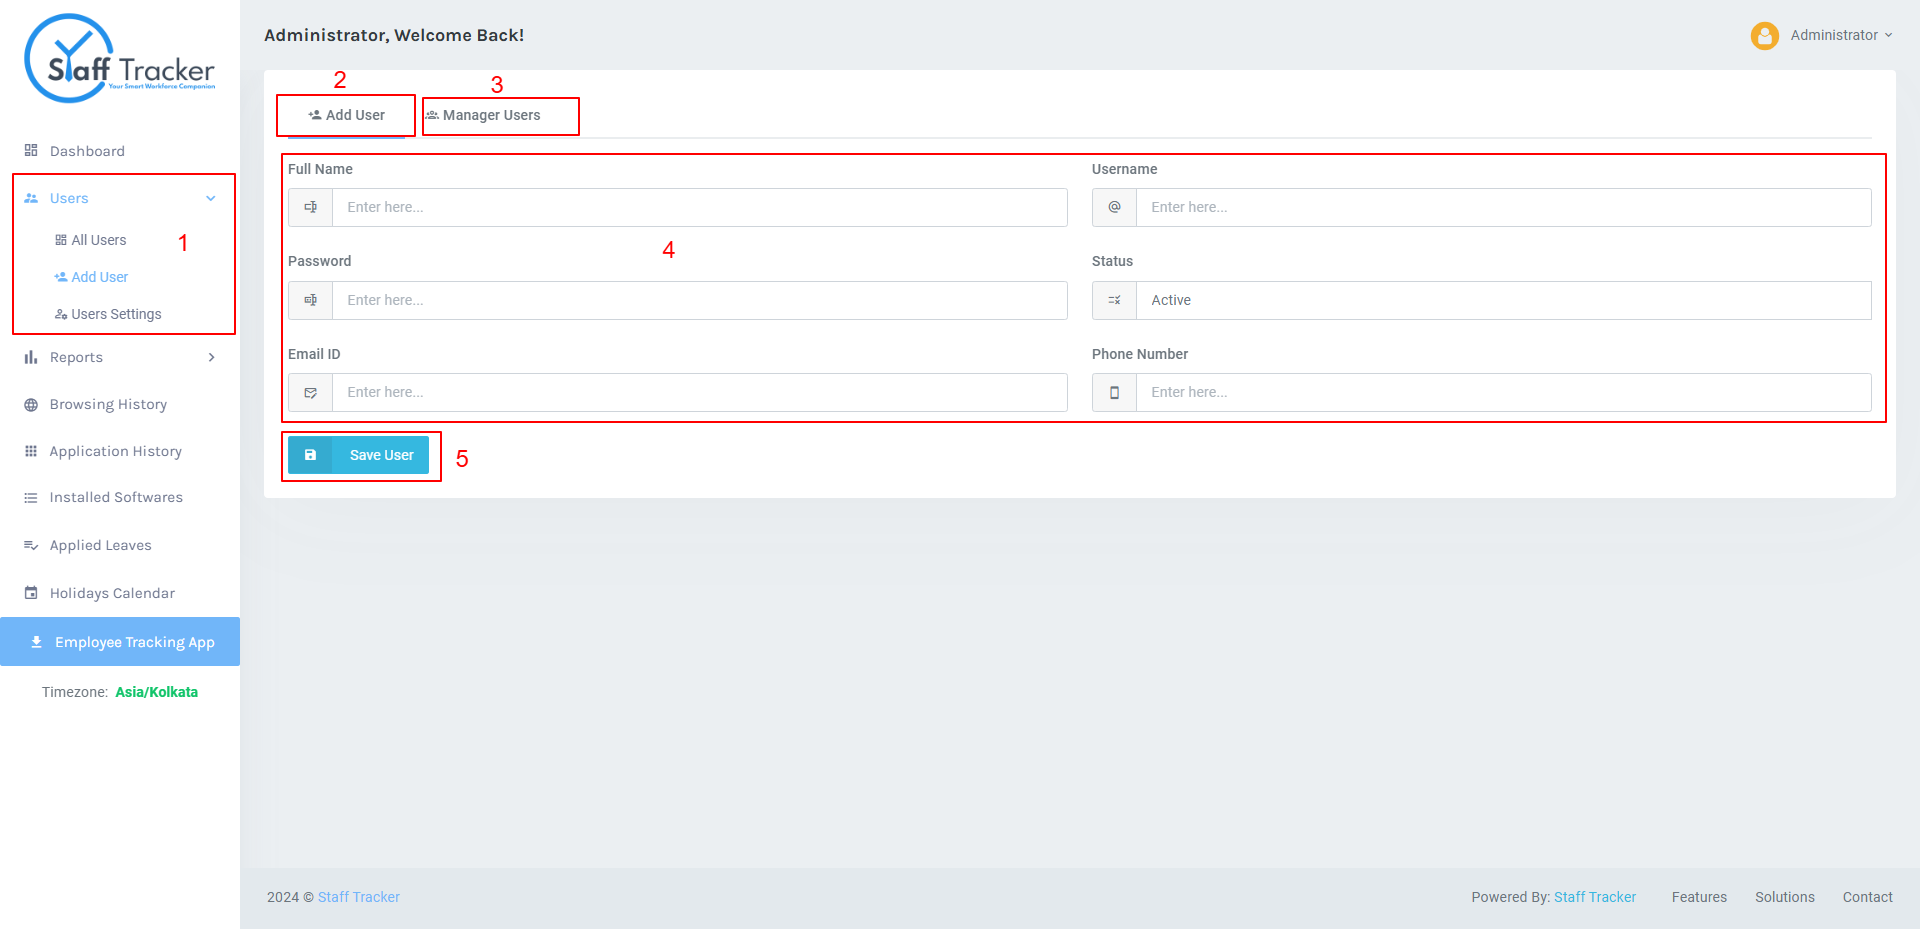
In the User section, you can easily
add new
users to your team.
- 1. Add User Link: This is usually a navigational element (e.g., a button or link) that directs the user to a page or modal where they can input details for a new user. It's often labeled "Add User" or "Create User."
- 2. Add User Tab: This tab is part of a tabbed navigation system within a dashboard, allowing users to access the functionality related to adding a new user. It's typically found in admin or user management sections.
- 3. Manage User Tab: Similar to the "Add User" tab, this one typically contains options for managing (viewing, editing, or deleting) existing users. It may be in a separate section for user administration.
- 4. Add User Form: The form itself includes fields for entering a new user's information, such as name, email, role, and permissions. The form may also include validation checks (e.g., to ensure the email is unique or properly formatted).
- 5. Add User Button: This button usually appears after the user fills in the form and is used to submit the data to the backend for processing (e.g., saving the user to a database).
Reporting
Access detailed reports for better insights:
-
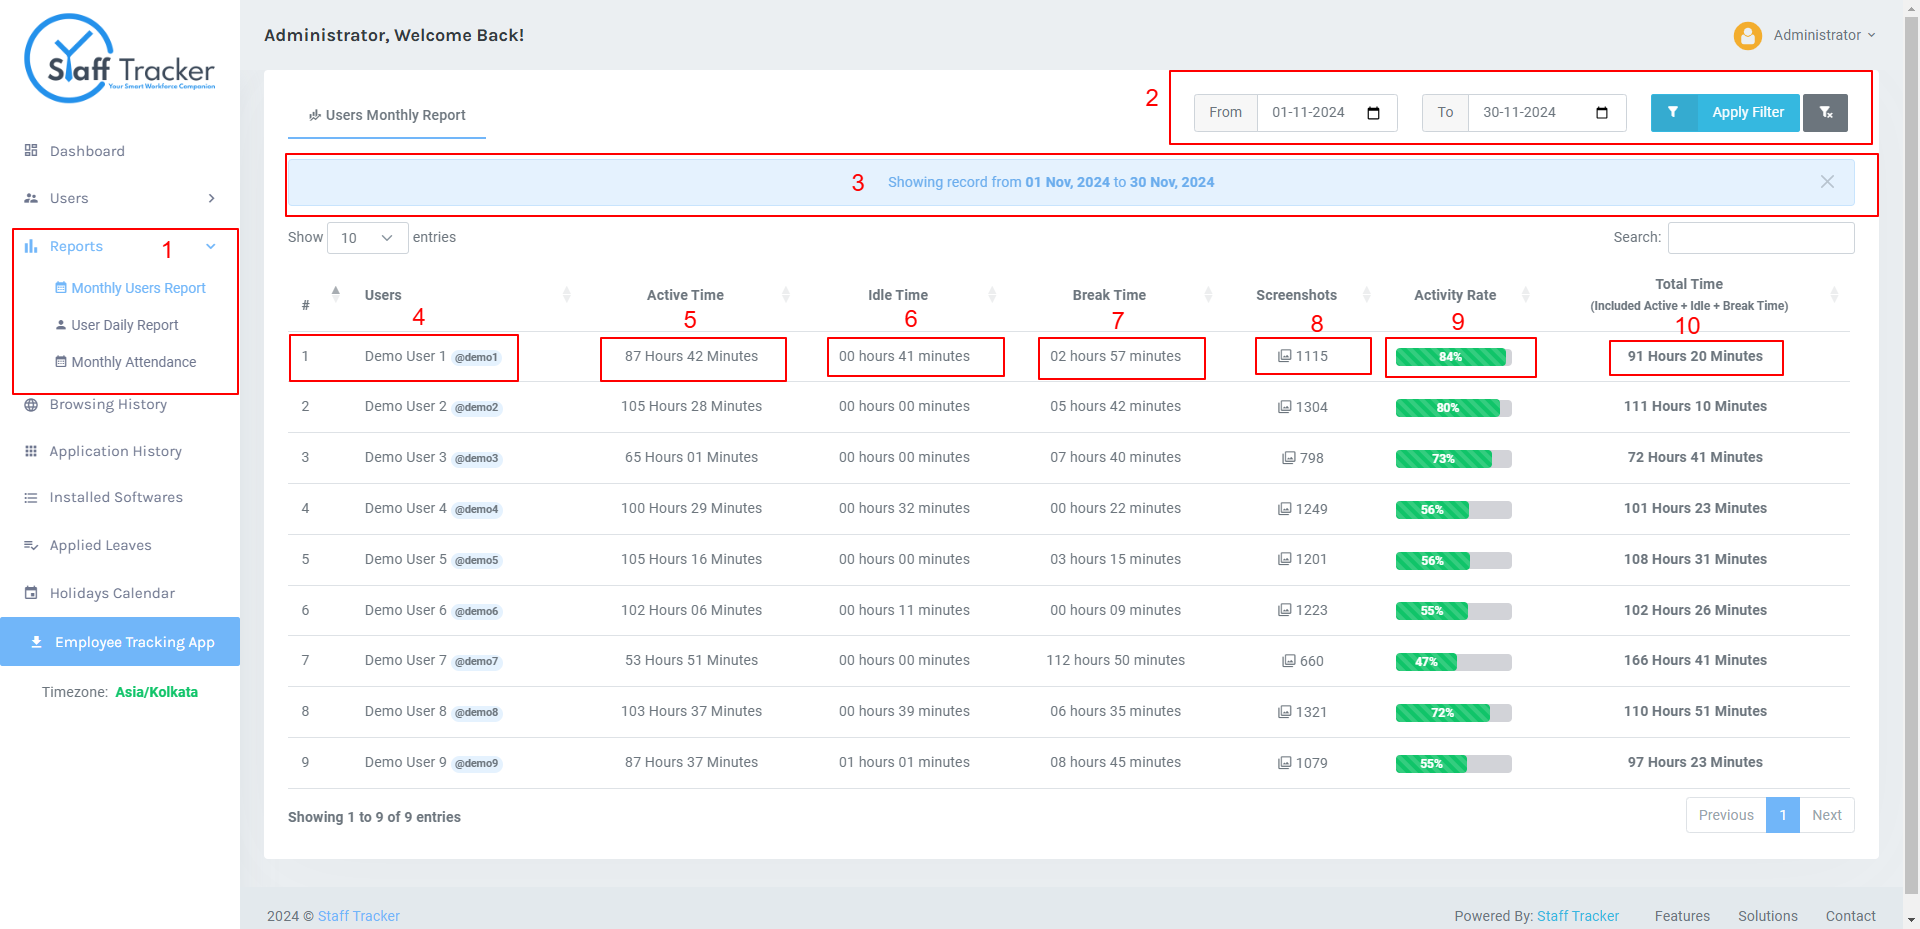
You can access monthly reports of
all user
- 1. Monthly User Report Menu Link: Access the monthly user report section from this menu link.
- 2. Date Range Filter Form: Use the form to filter reports by a specific date range.
- 3. Selected Filter Date Display Card: Displays the selected date range for easy reference.
- 4. User Detail Column: View detailed information for each user in the report.
- 5. Total Active Time: Shows the total active time for the selected date range.
- 6. Total Idle Time: Displays the total idle time within the selected date range.
- 7. Total Break Time: Summarizes the total break time for the selected date range.
- 8. Total Screenshot Counter: Shows the total number of screenshots taken during the selected date range.
- 9. Final Activity Bar: A visual representation of user activity across the selected date range.
- 10. Total Time (Active + Idle + Break): Displays the combined total of active, idle, and break times for the selected date range.
-
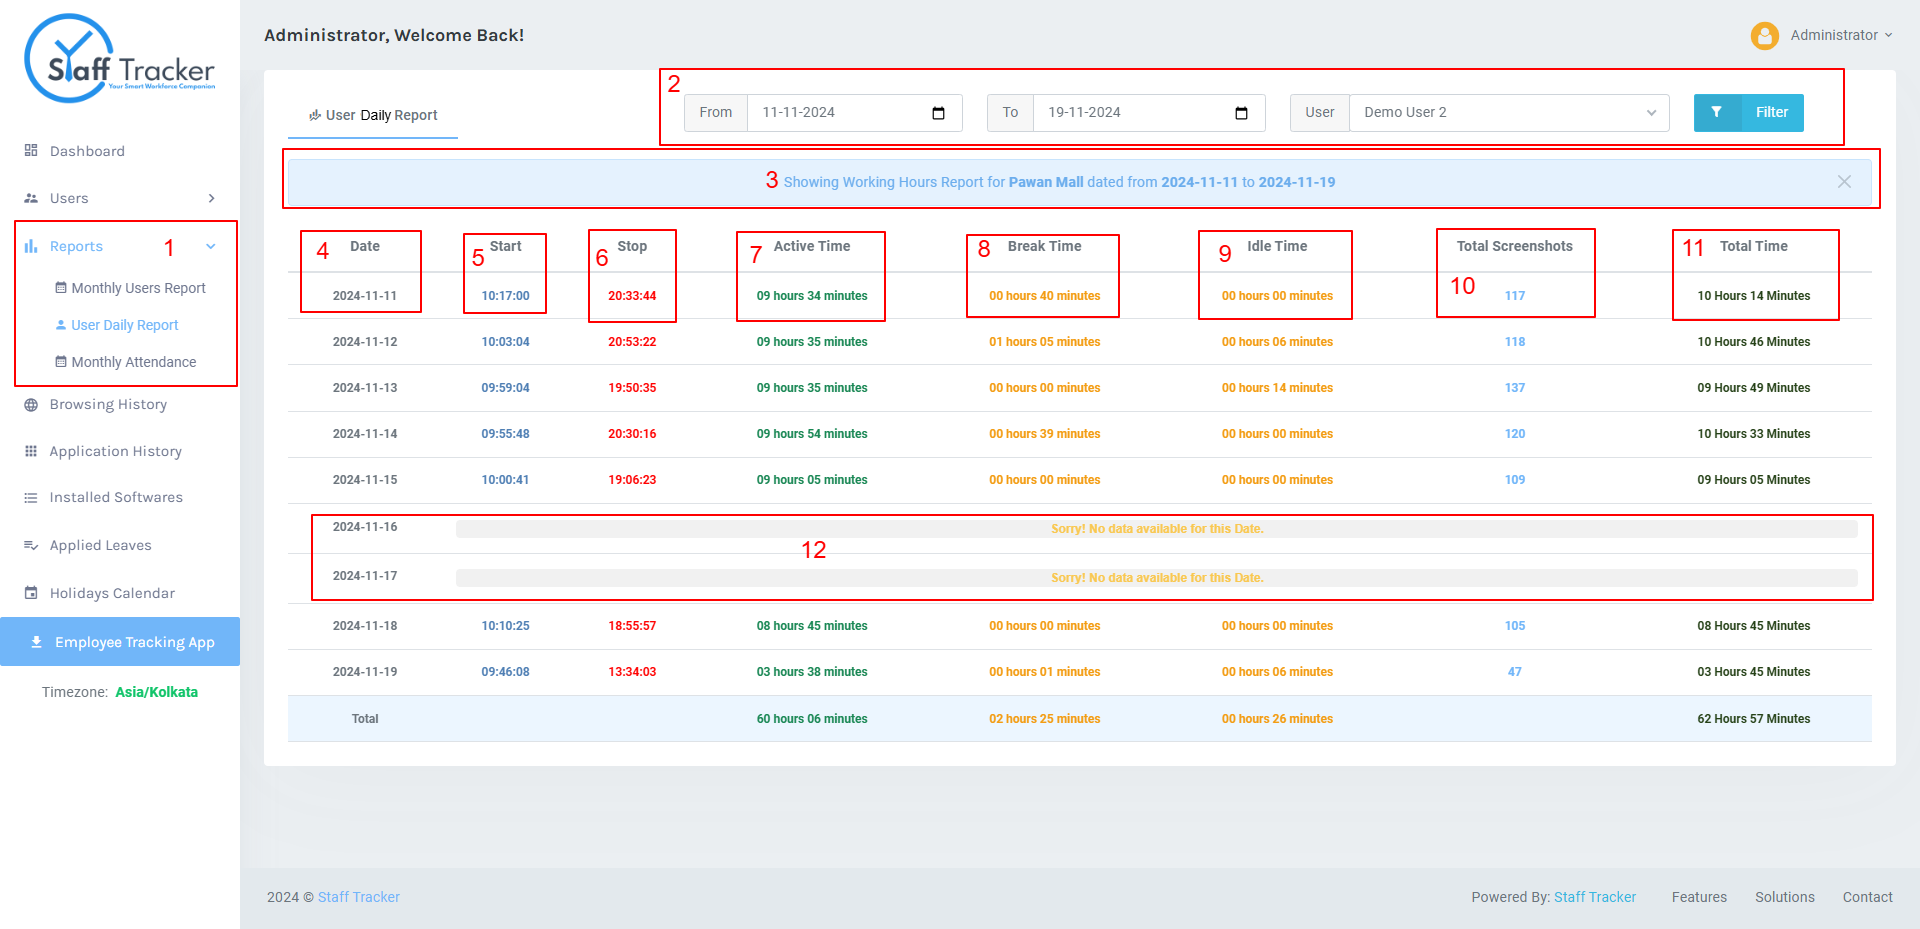
You can also access reports of
individual
from the user daily section
- 1. User Daily Report Menu Link: Access the daily report section for user activity.
- 2. Date Range Filter Form with User List Filter: Filter the daily report by date range and specific users.
- 3. Filter Text Display Card: Displays the selected filter criteria (date range and users).
- 4. Daily Date Column: Shows the specific date for each report entry.
- 5. Start Time Column: Displays the time when the user started their activity.
- 6. End Time Column: Shows the time when the user's activity ended.
- 7. Active Time Column: Tracks the total active time for the user on that specific day.
- 8. Break Time Column: Displays the total break time for the user on that day.
- 9. Idle Time Column: Tracks the idle time for the user during the day.
- 10. Screenshot Counter Column: Shows the number of screenshots captured for the user.
- 11. Total Timer Column: Displays the total time spent (active + idle + break) for the user on that day.
- 12. Empty Rows for Inactive Users: Shows empty rows when a user did not log in on that day.
-
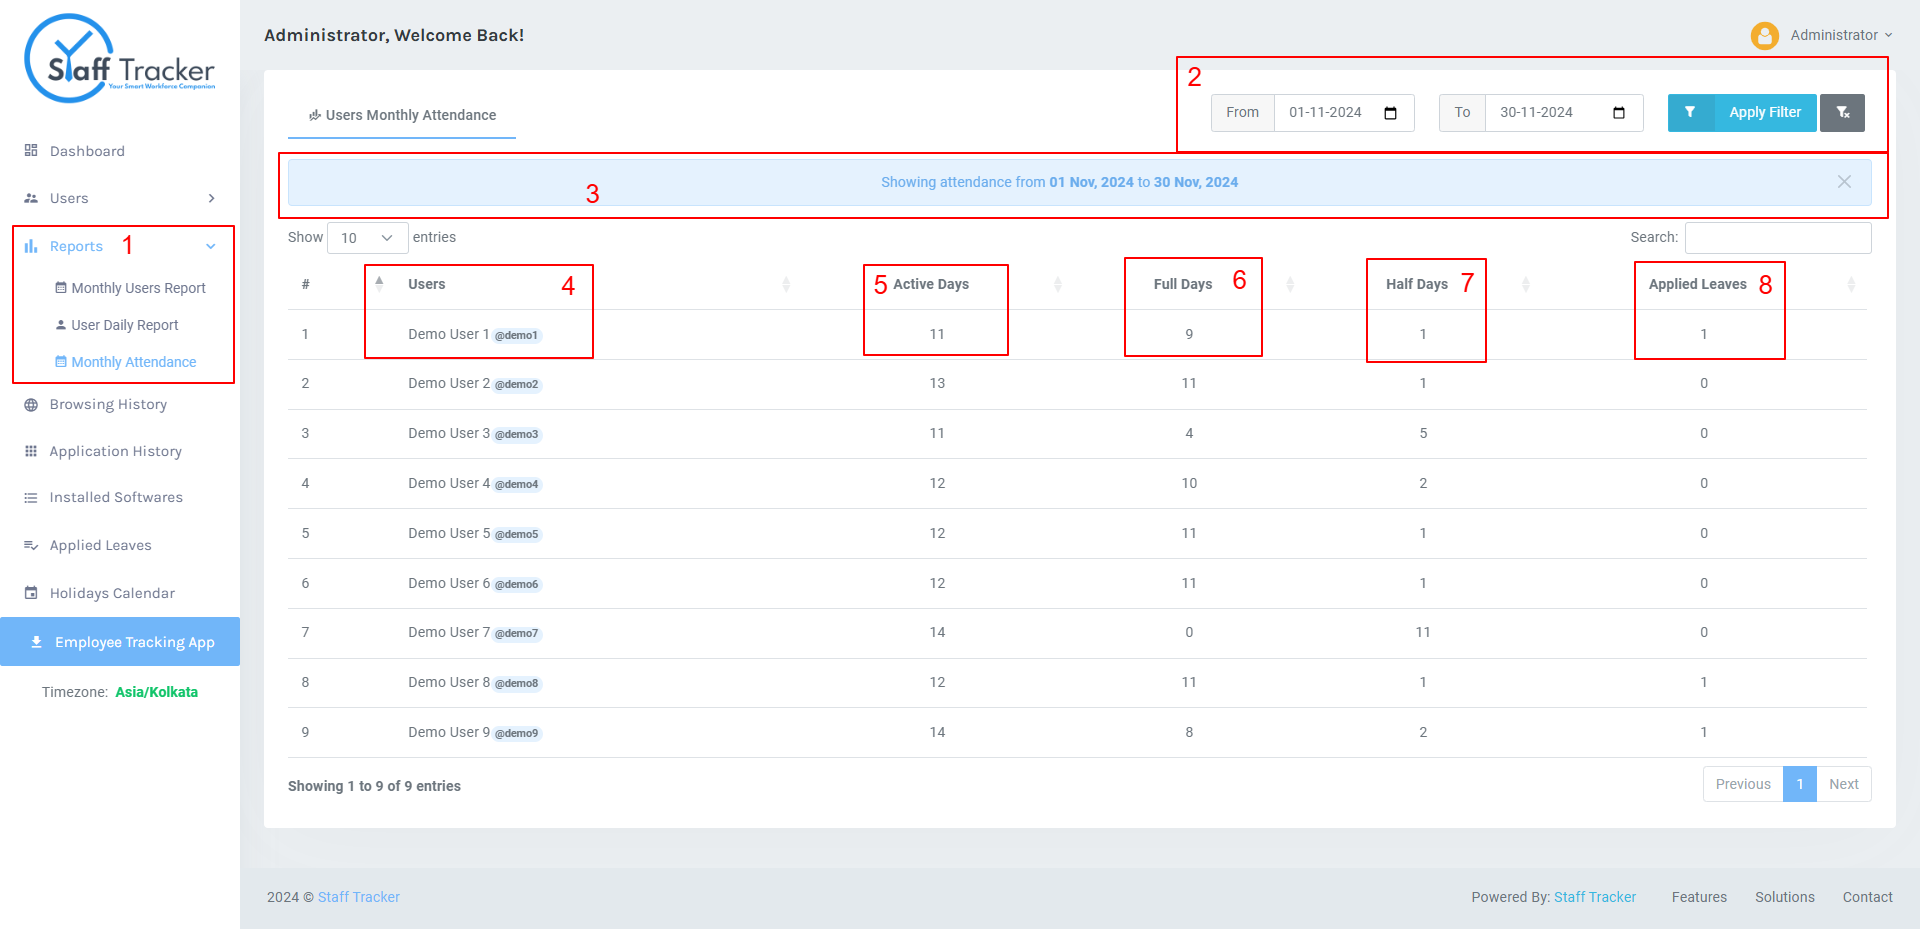
Monthly attendance tracking for each
employee.
- 1. User Monthly Attendance Menu Link: Navigate to the section for viewing monthly attendance reports.
- 2. Date Range Filter Form with User List Filter: Filter the attendance report by a specific date range and user list.
- 3. Filter Text Display Card: Displays the active filters, such as selected date range and users.
- 4. User Details Column: Displays detailed information for each user.
- 5. Active Days Counter Column: Tracks the total number of active days for each user in the selected period.
- 6. Full Days Counter Column: Counts the number of full working days the user attended.
- 7. Half Days Counter Column: Tracks the number of half days attended by the user.
- 8. Applied Leaves Counter Column: Displays the number of leave days applied by the user during the selected period.
Browsing History
Monitor employee browsing activity:
-
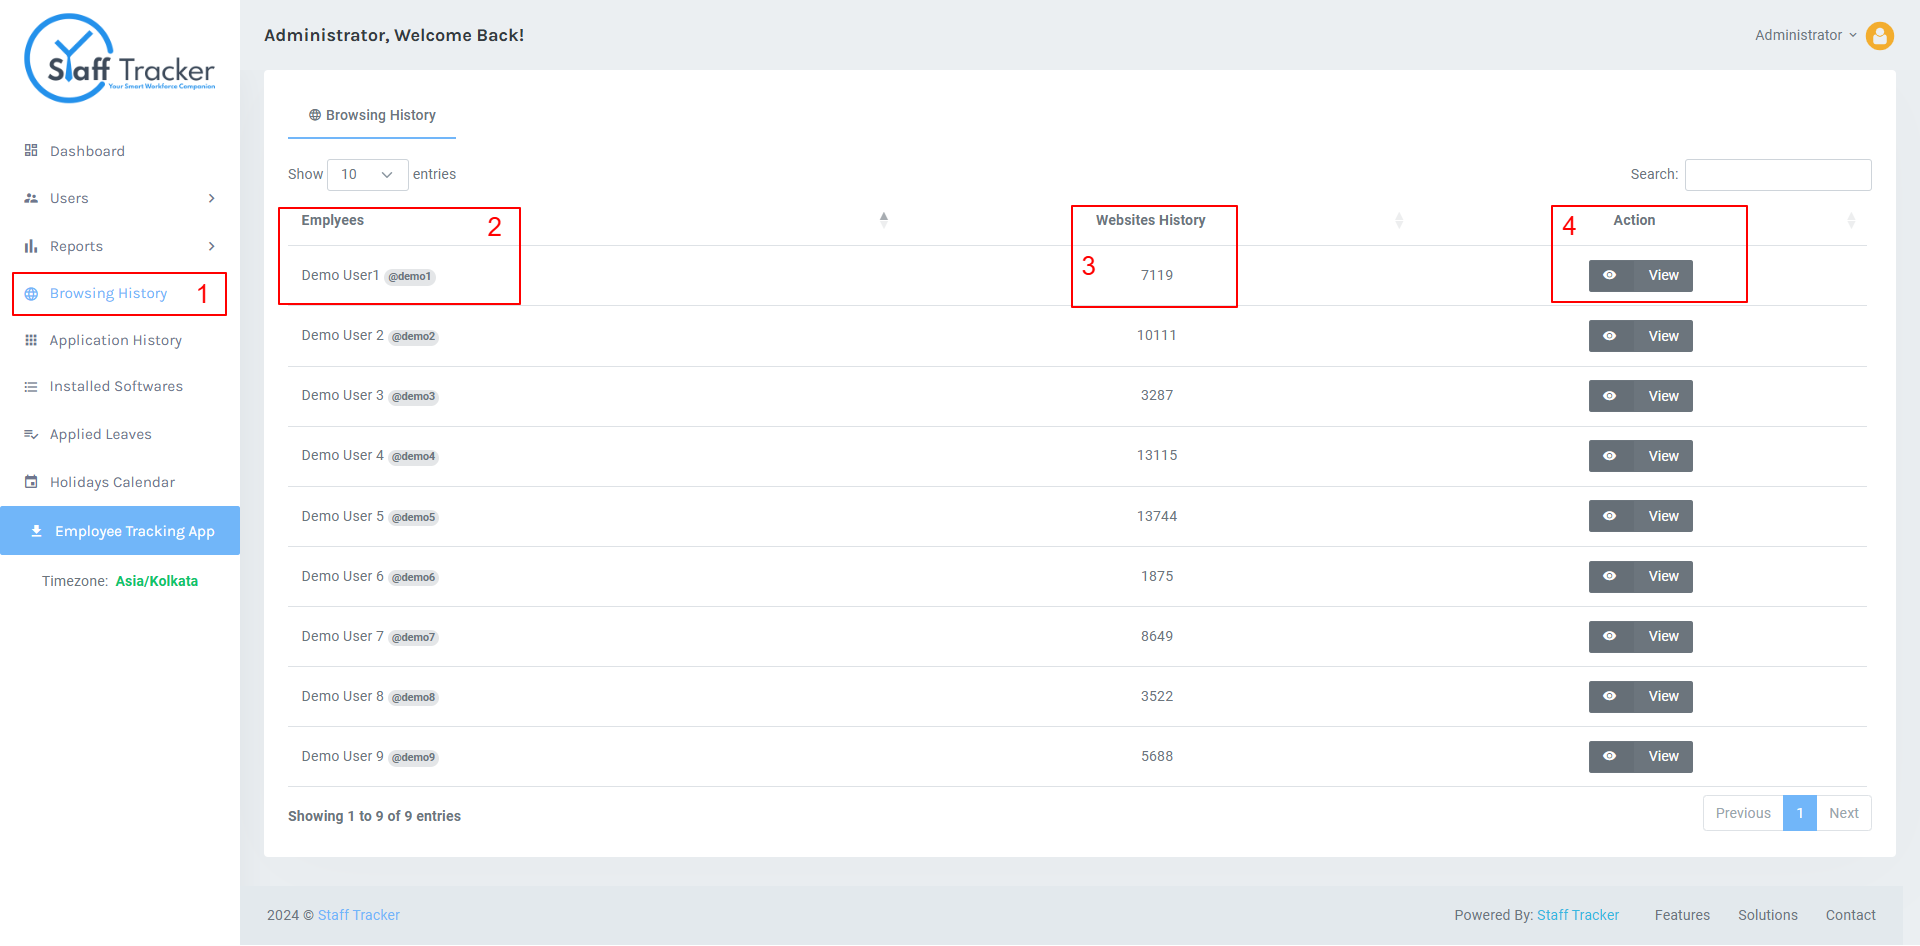
View detailed browsing history of users: Browsing History
Dashboard
- 1. Browsing History Menu Link: Access the section for viewing user browsing history.
- 2. User Details Column: Displays detailed information for each user.
- 3. Total Number of Browsing History URLs (User-wise): Shows the total number of URLs accessed by each user.
- 4. Browsing History Detail Page: View detailed browsing activity for each user, including visited URLs, timestamps, and other relevant details.
-
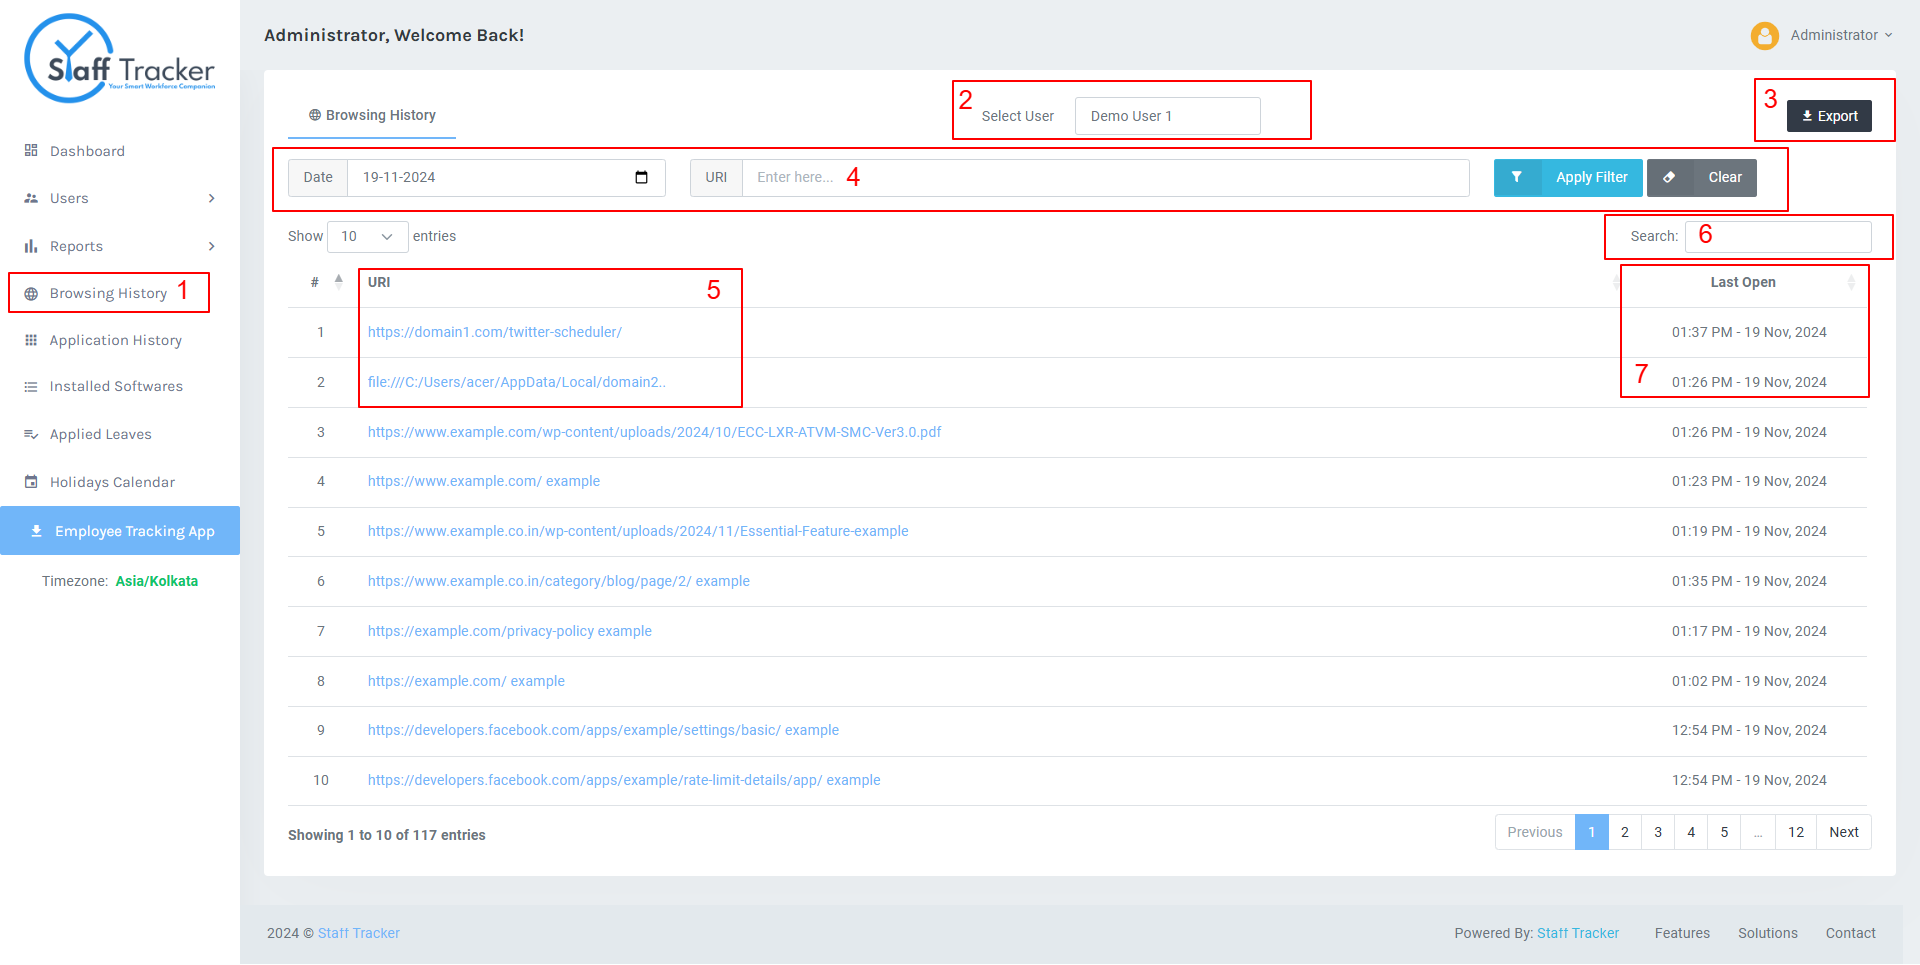
View detailed browsing history of users: Browsing History
Dashboard
- 1. Browsing History Menu Link: Access the section to view and manage user browsing history.
- 2. User-wise Filter Form Selector: Select specific users to filter their browsing history.
- 3. Export Button: Export browsing history data for the selected user.
- 4. Date and URL Filter Form: Filter browsing history by specific dates and URLs.
- 5. Collected Web History URLs: Displays the list of URLs accessed by the user during the selected period.
- 6. Search Form: Search for specific URLs or keywords within the browsing history.
- 7. Last Open Timestamp Column: Displays the timestamp of when the user last accessed each URL.
Application History
Monitor employee application activity:
-
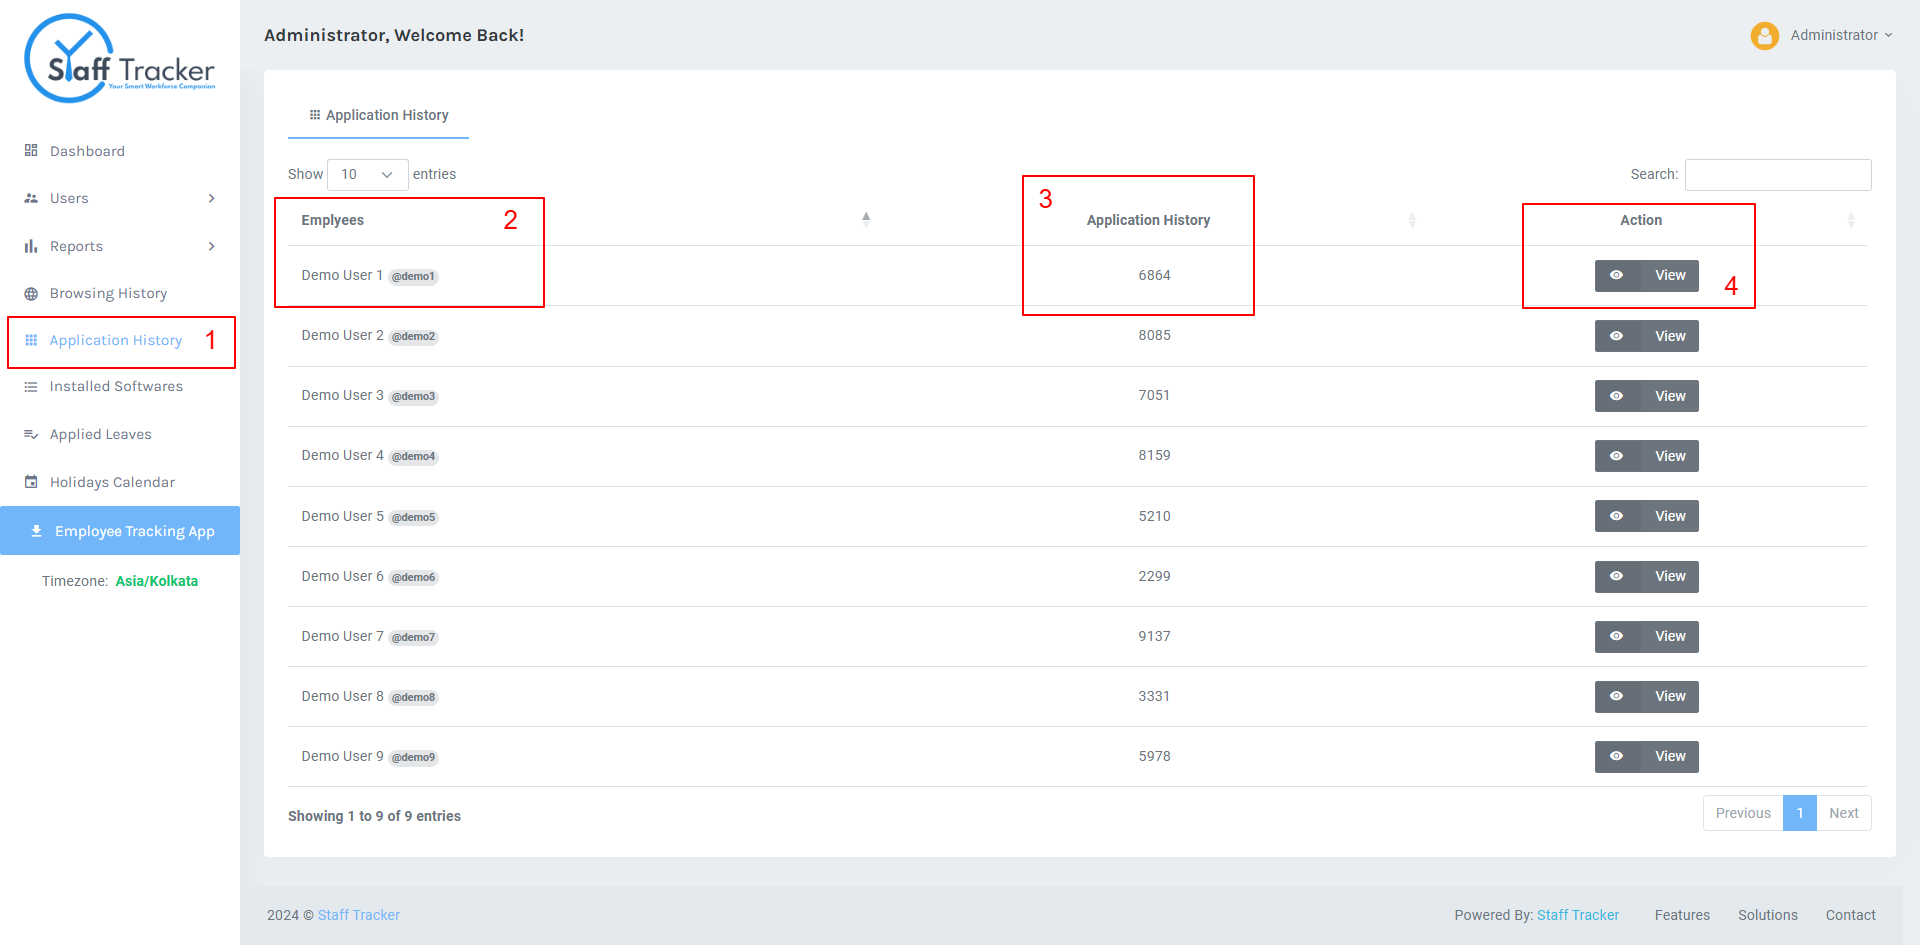
Application History Dashboard: You can also view detailed
application
history of users
- 1. Application History Menu Link: Access the section for viewing user Application History.
- 2. User Details Column: Displays detailed information for each user.
- 3. Total Number of Application History Apps Name (User-wise): Shows the total number of apps opened by each user.
- 4. Application History Detail Page: View detailed app opened activity for each user, including visited app name, timestamps, and other relevant details.
-
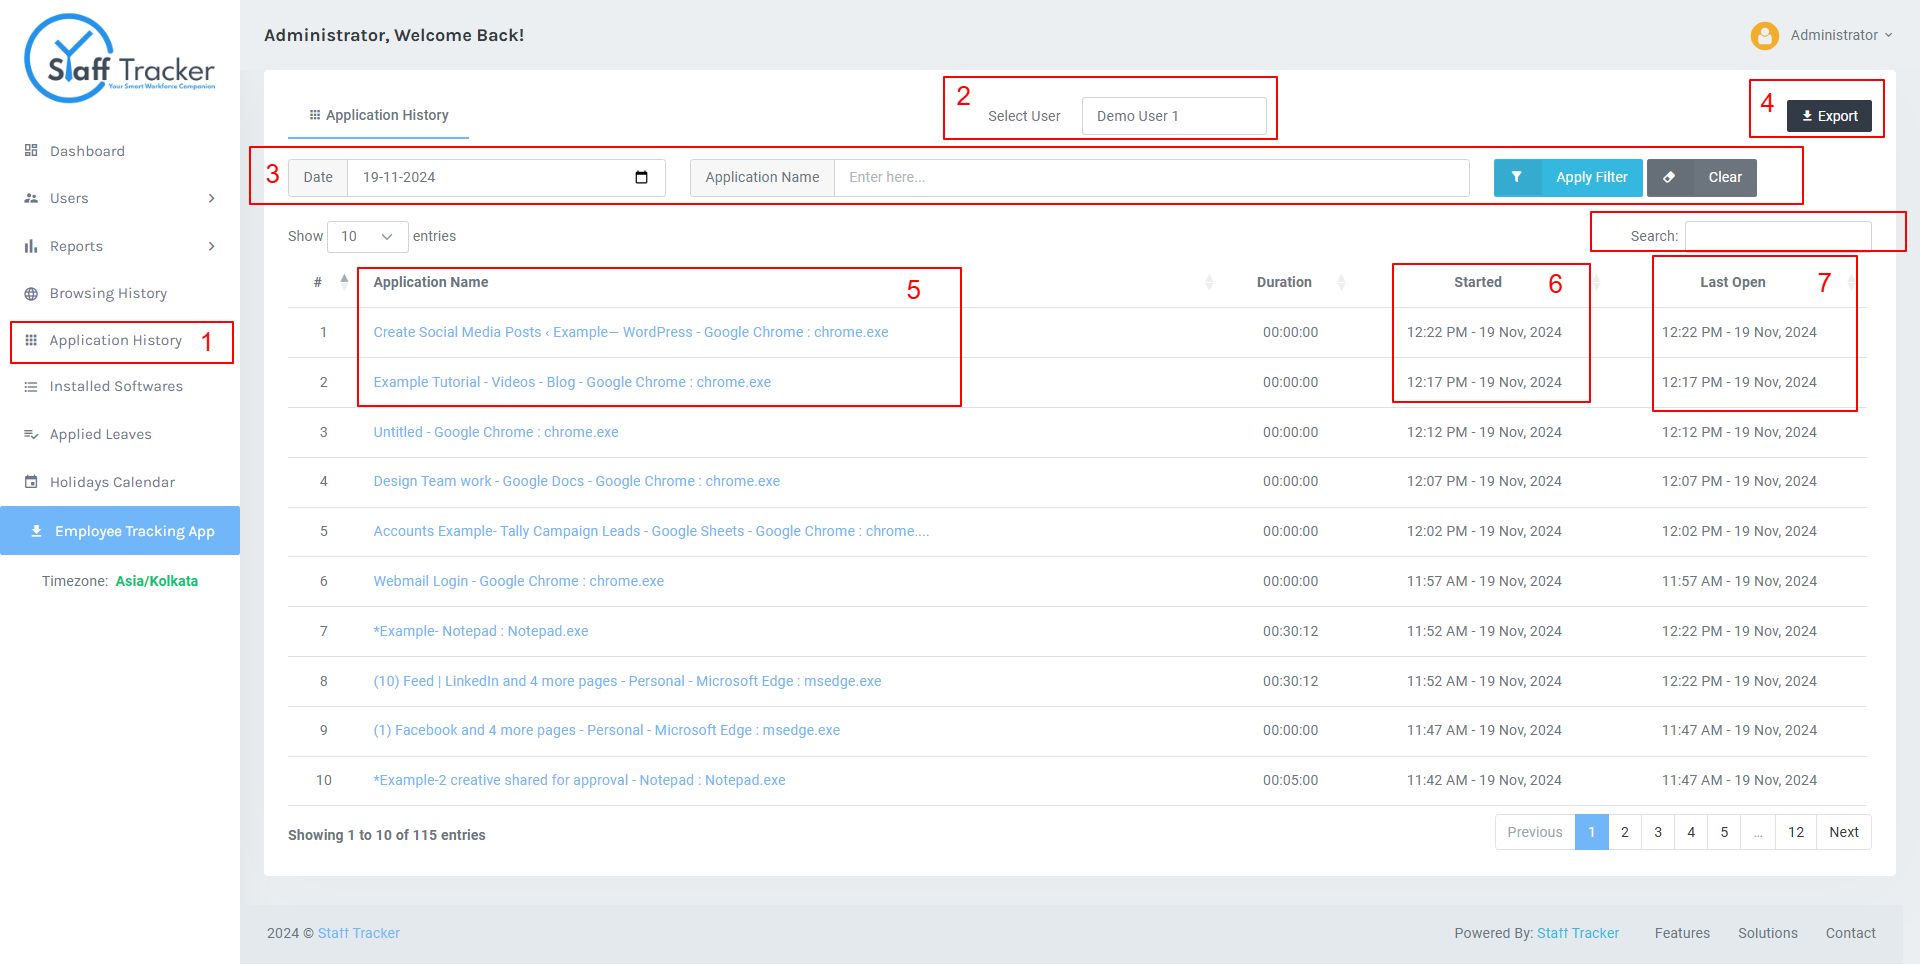
Application History Dashboard: You can also view detailed
application
history of users
- 1. Application History Menu Link: Access the section to view and manage user application history.
- 2. User-wise Filter Form Selector: Select specific users to filter their application history.
- 3. Export Button: Export application history data for the selected user.
- 4. Date and Application Name Filter Form: Filter application history by specific dates and application names.
- 5. Collected Application Name Info: Displays the list of applications used by the user during the selected period.
- 6. Started From: Shows the start time or session initiation for each application.
- 7. Last Open Timestamp Column: Displays the timestamp of when the user last used the application.
Installation Softwares
Monitor employee installation softwares :
-
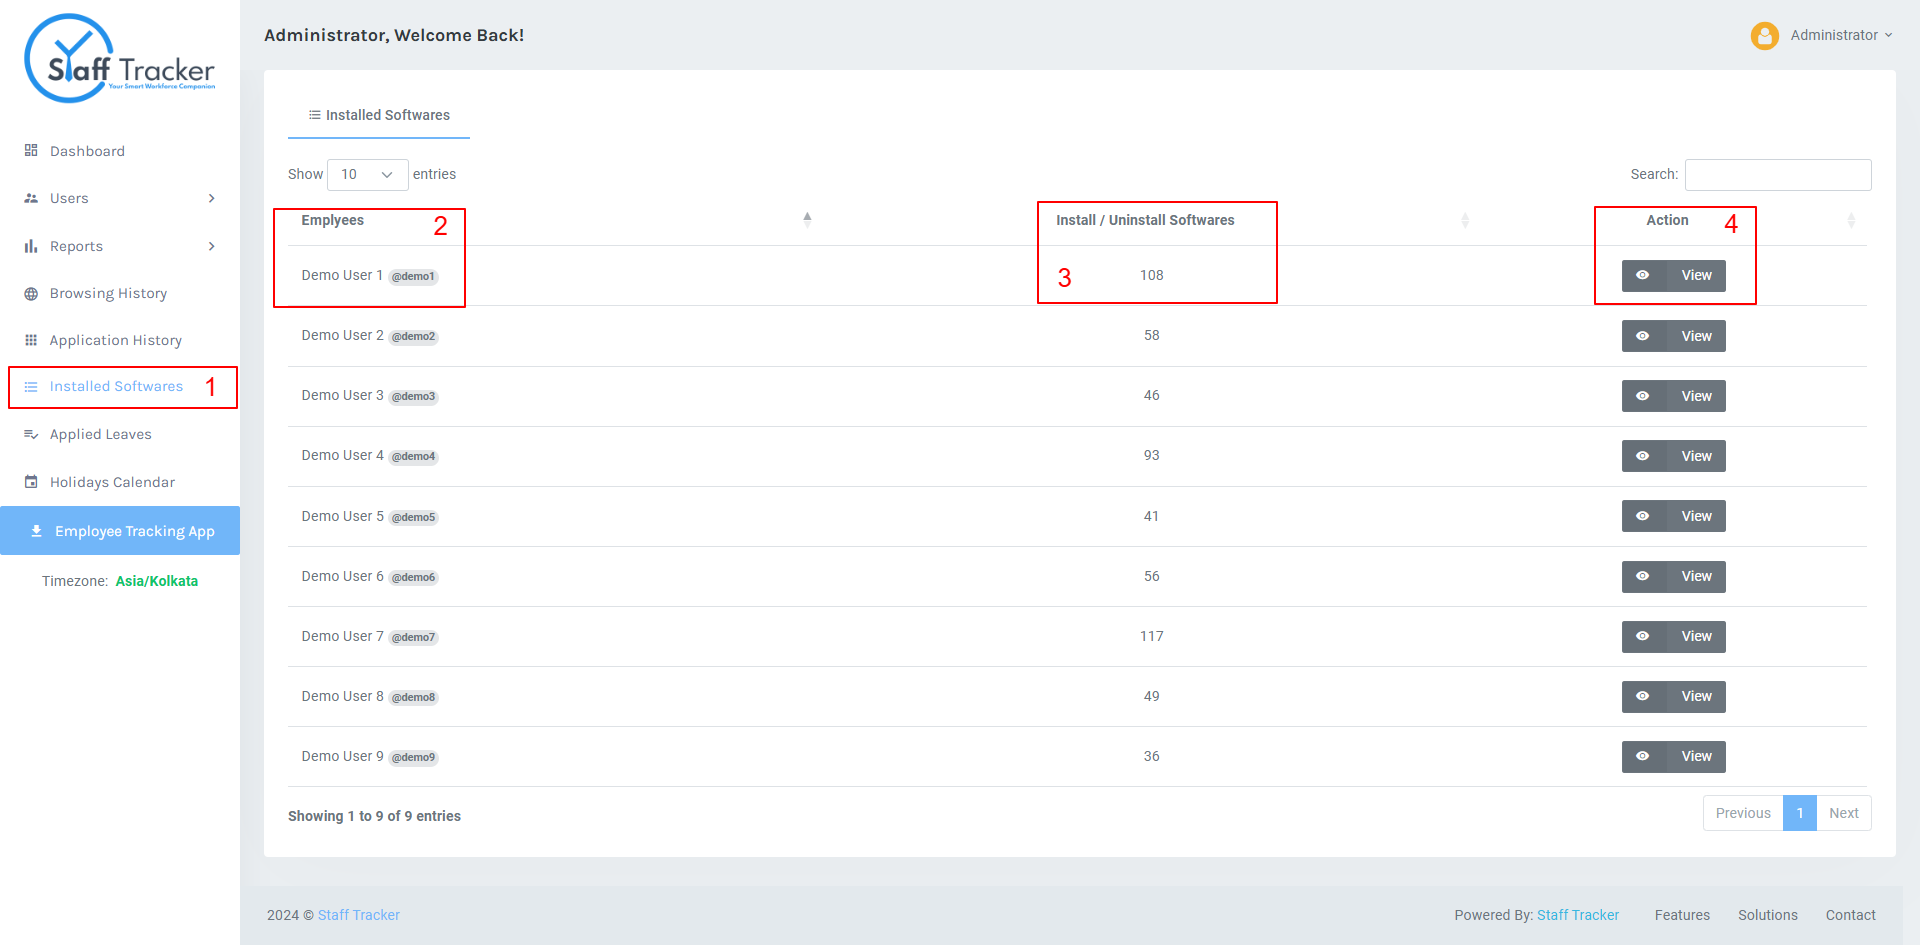
Installed Applications Dashboard: You can also view detailed
Installed Applications of users
- 1. Installed Applications Menu Link: Access the section for viewing user Installed Applications.
- 2. User Details Column: Displays detailed information for each user.
- 3. Total Number of Installed Application (User-wise): Shows the total number of Installed Applications by each user.
- 4. Installed Applications Detail Page: View detailed Installed Applications activity for each user, including app name, timestamps, and other relevant details.
-
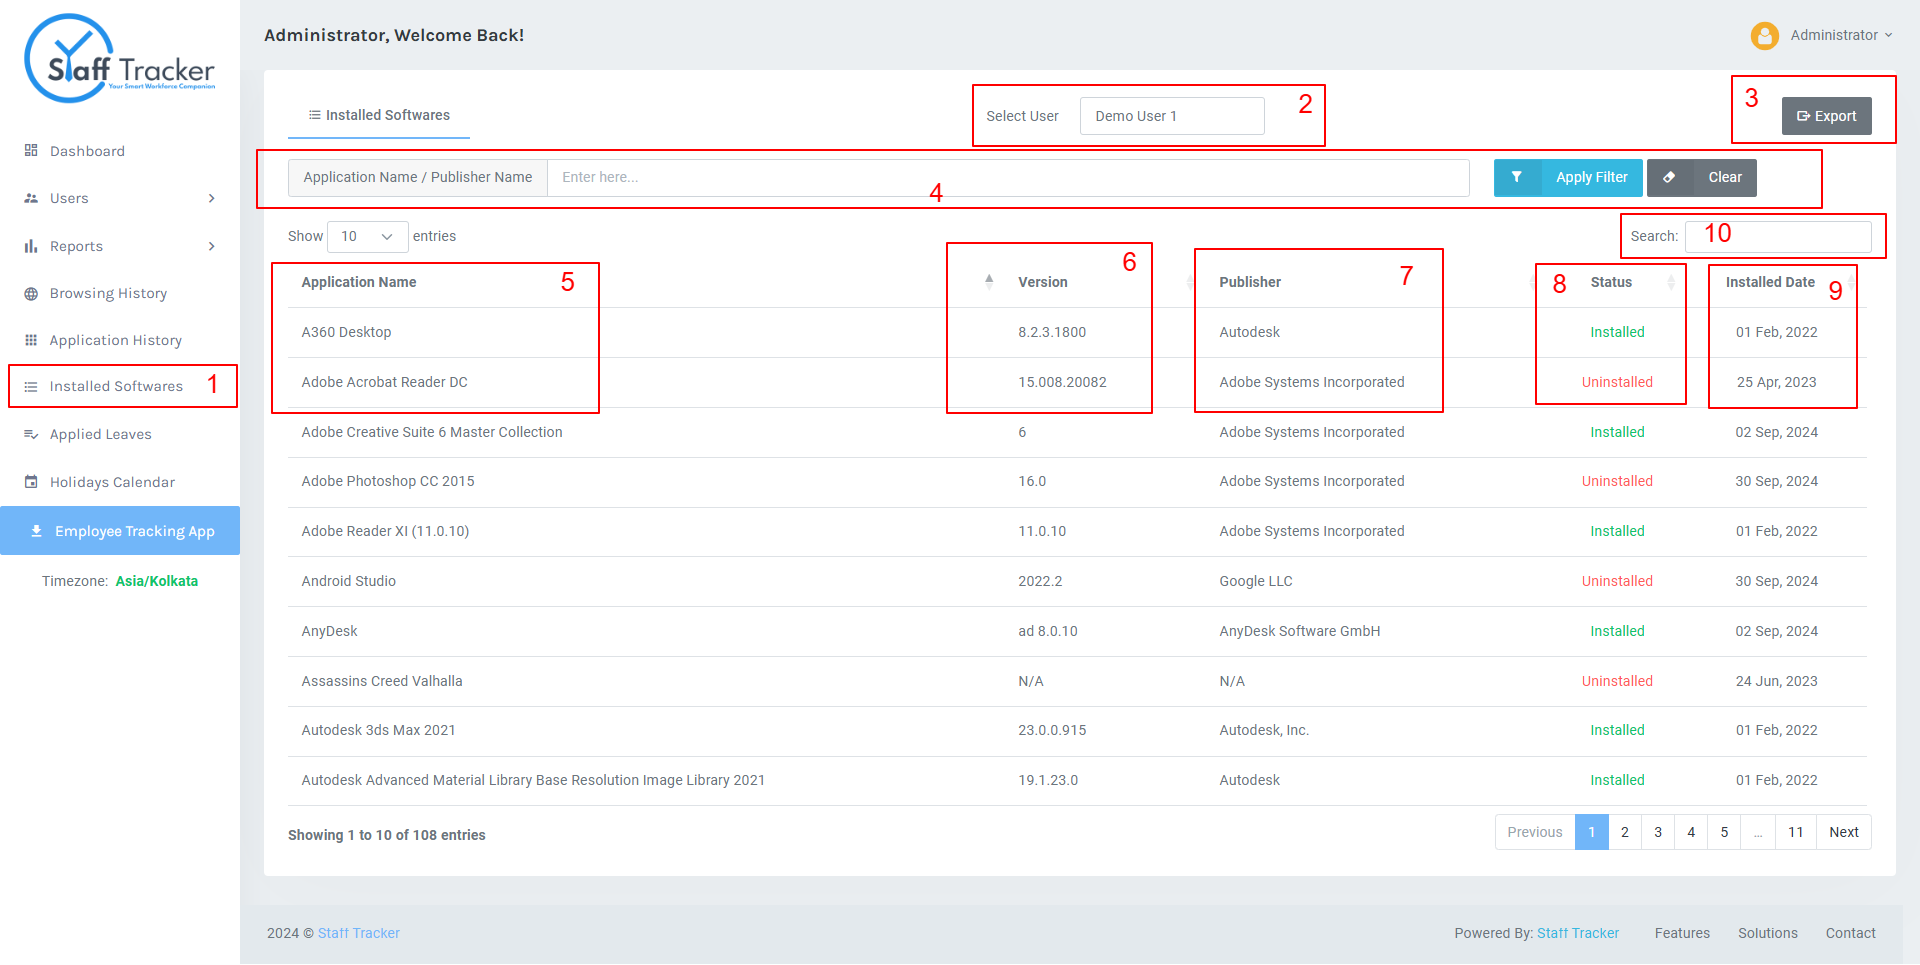
Application History Dashboard: You can also view detailed
application
history of users
- 1. Installed Applications Menu Link: Access the section to view and manage installed applications on users' devices.
- 2. User-wise Filter Form Selector: Select specific users to filter the installed applications data.
- 3. Export Button: Export the installed applications data for the selected user.
- 4. Publisher and Application Name Filter Form: Filter installed applications by publisher or application name.
- 5. Installed Application Name Info: Displays the names of applications installed on the user's device.
- 6. Version of Software: Shows the version of each installed application.
- 7. Publisher Name: Displays the name of the publisher or developer of the application.
- 8. Software Installation Status: Indicates whether the software is currently installed or not.
- 9. Installation Date: Displays the date when the application was installed on the user's device.
Leave Management
Manage leave applications with ease: Employees can apply for leave, and managers can review and approve leave requests.
-
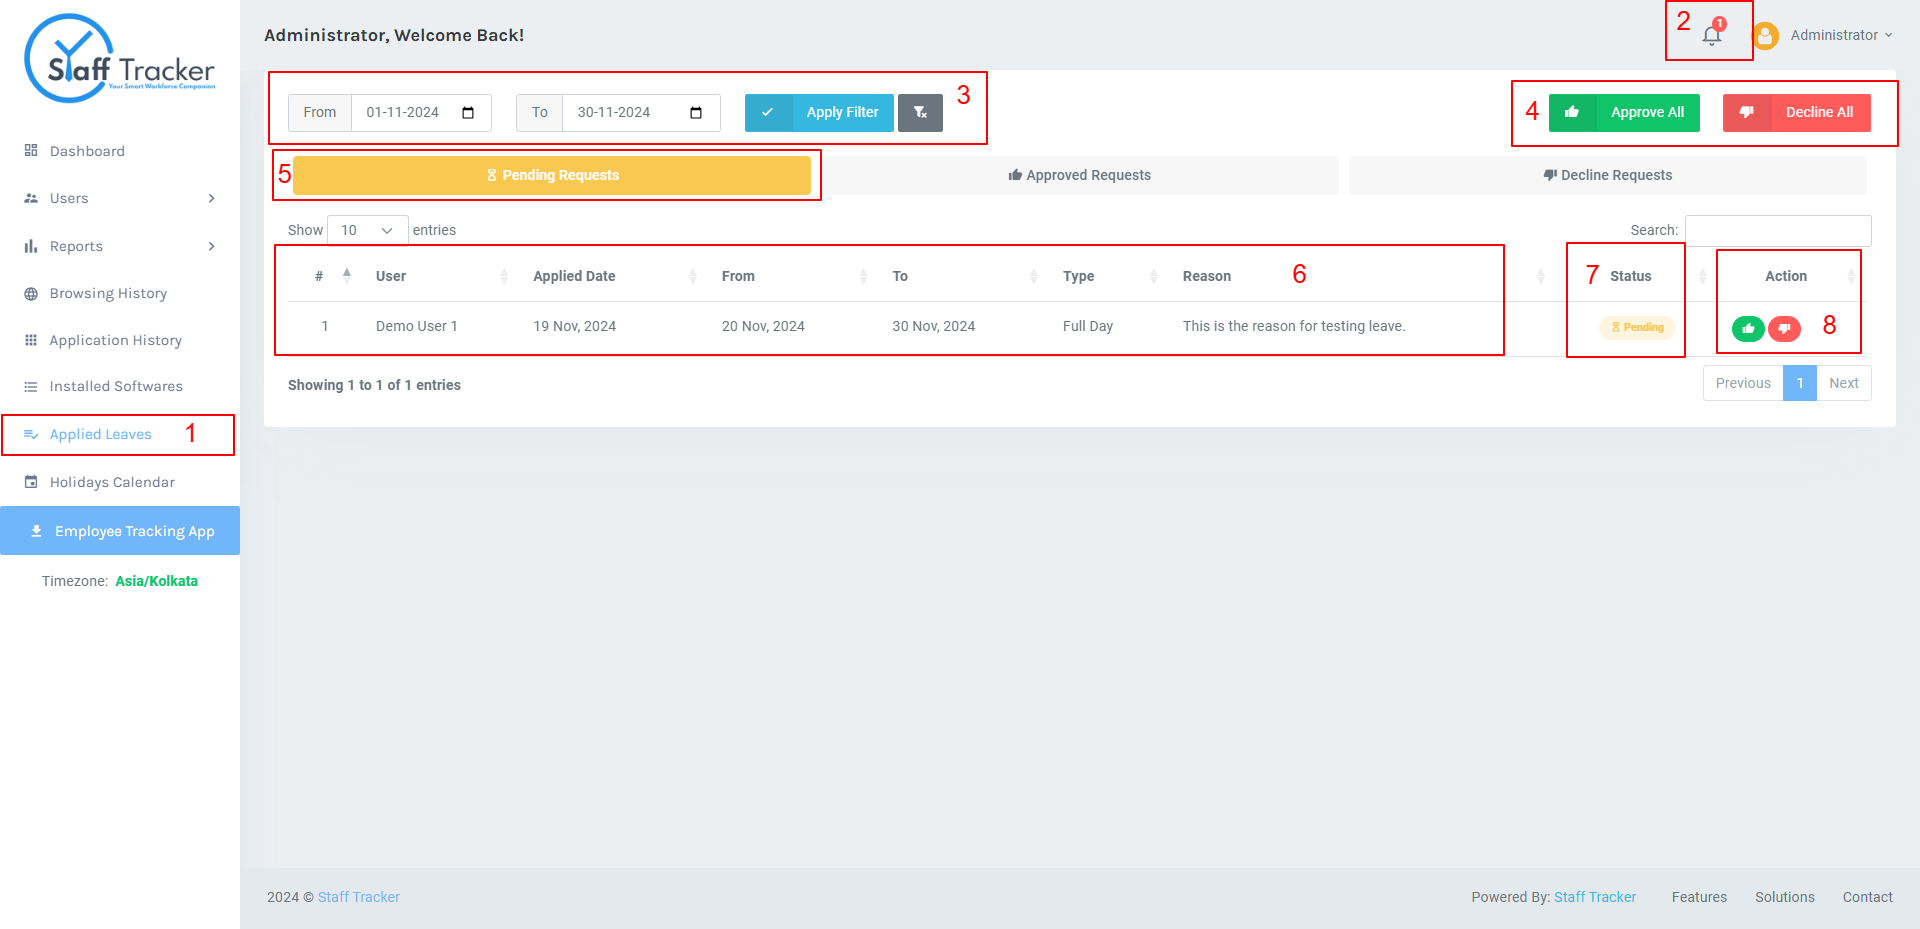
Pending Leaves Dashboard
- 1. Applied Leaves Menu Link: Access the section to view and manage employee leave requests.
- 2. Leave Notification Bell Icon with Leave Counter: Displays a notification icon showing the number of pending leave requests.
- 3. Leave Date Range Filter: Filter leave requests by a specific date range.
- 4. Approve/Decline All Leaves Button: Quickly approve or decline all leave requests at once.
- 5. Pending Leave Tab Button: Switch to view only the pending leave requests.
- 6. Applied Leave Details Table: Displays a detailed table with information on each leave request.
- 7. Leave Status: Shows the current status of each leave request (approved, pending, declined).
- 8. Leave Action Button: Provides options to approve, decline, or take other actions on leave requests.
-
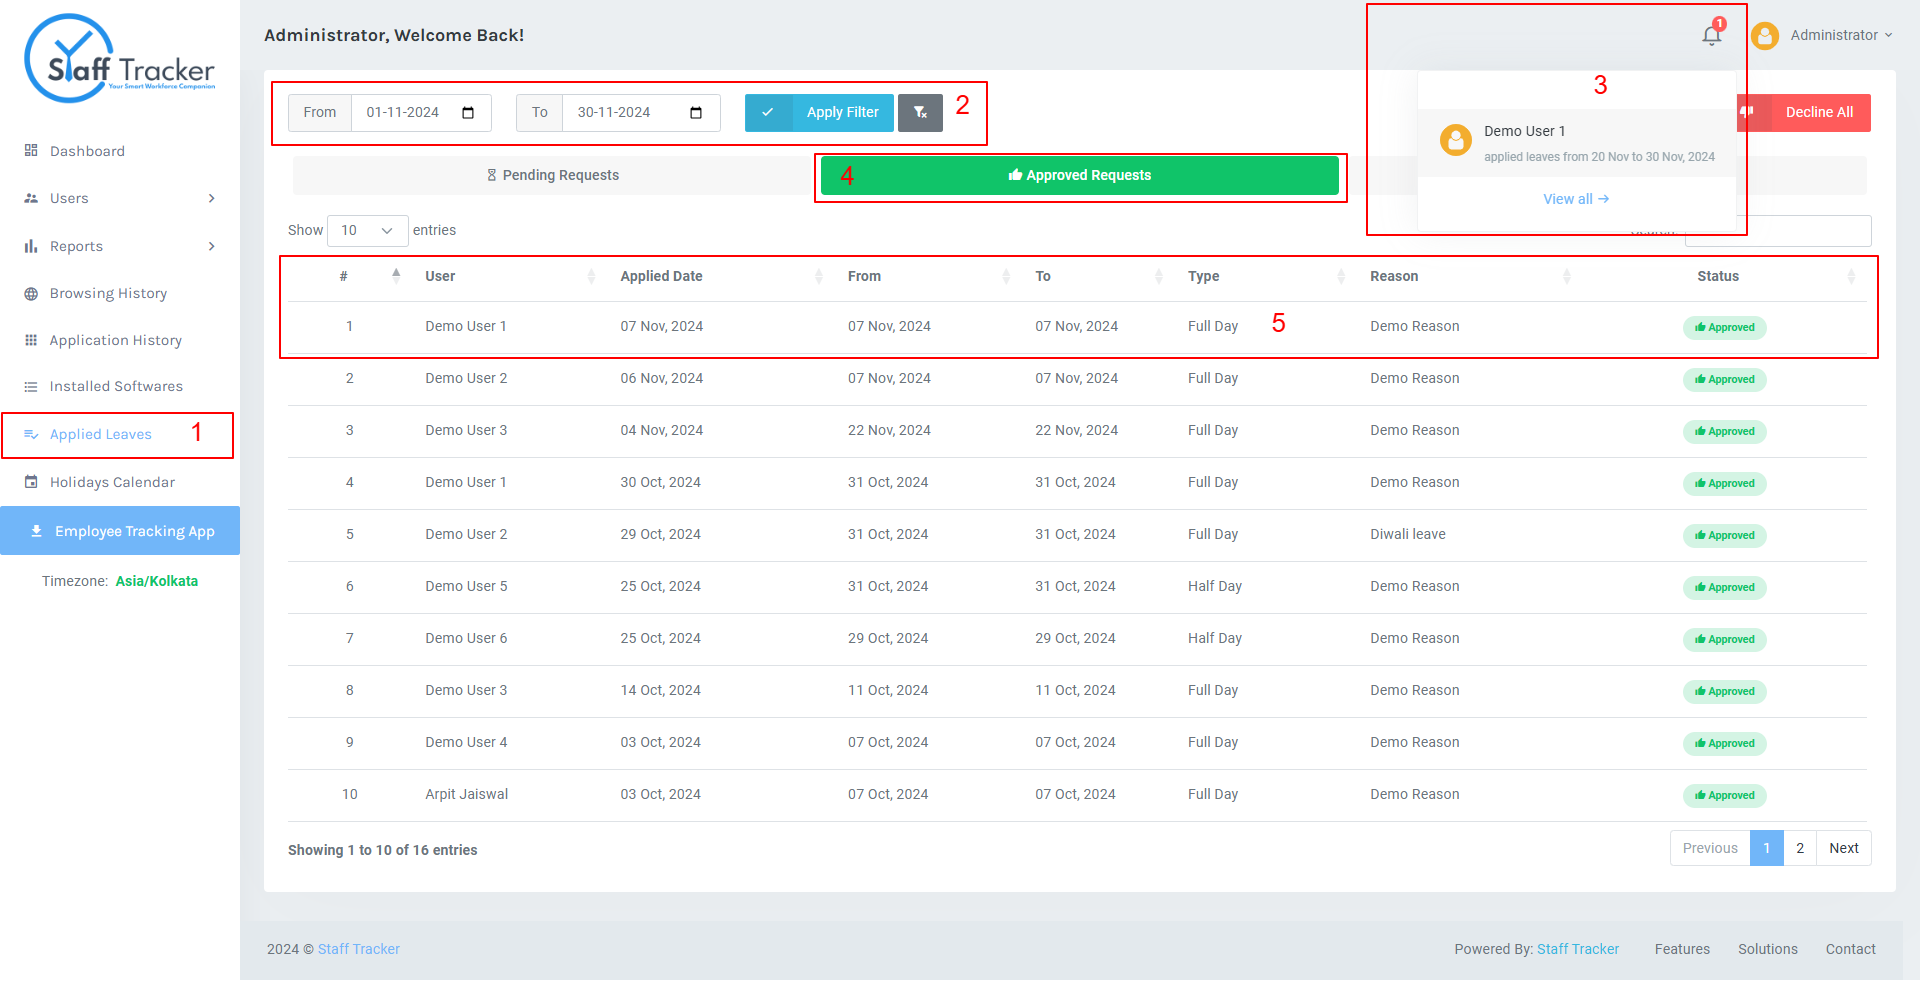
Approved Leaves Dashboard
- 1. Applied Leaves Menu Link: Access the section to view and manage employee leave requests.
- 2. Leave Date Range Filter: Filter leave requests based on a specific date range.
- 3. Leave Notification Bell Icon with Leave Counter: Displays a bell icon showing the number of pending leave requests, along with basic leave details such as the employee's name and requested leave dates.
- 4. Approved Leave Tab Button: Switch to view only the approved leave requests.
- 5. Applied Leave Details Table: A table displaying detailed leave information, including leave status (approved, pending, or declined), with options for taking actions such as approval or decline.
-
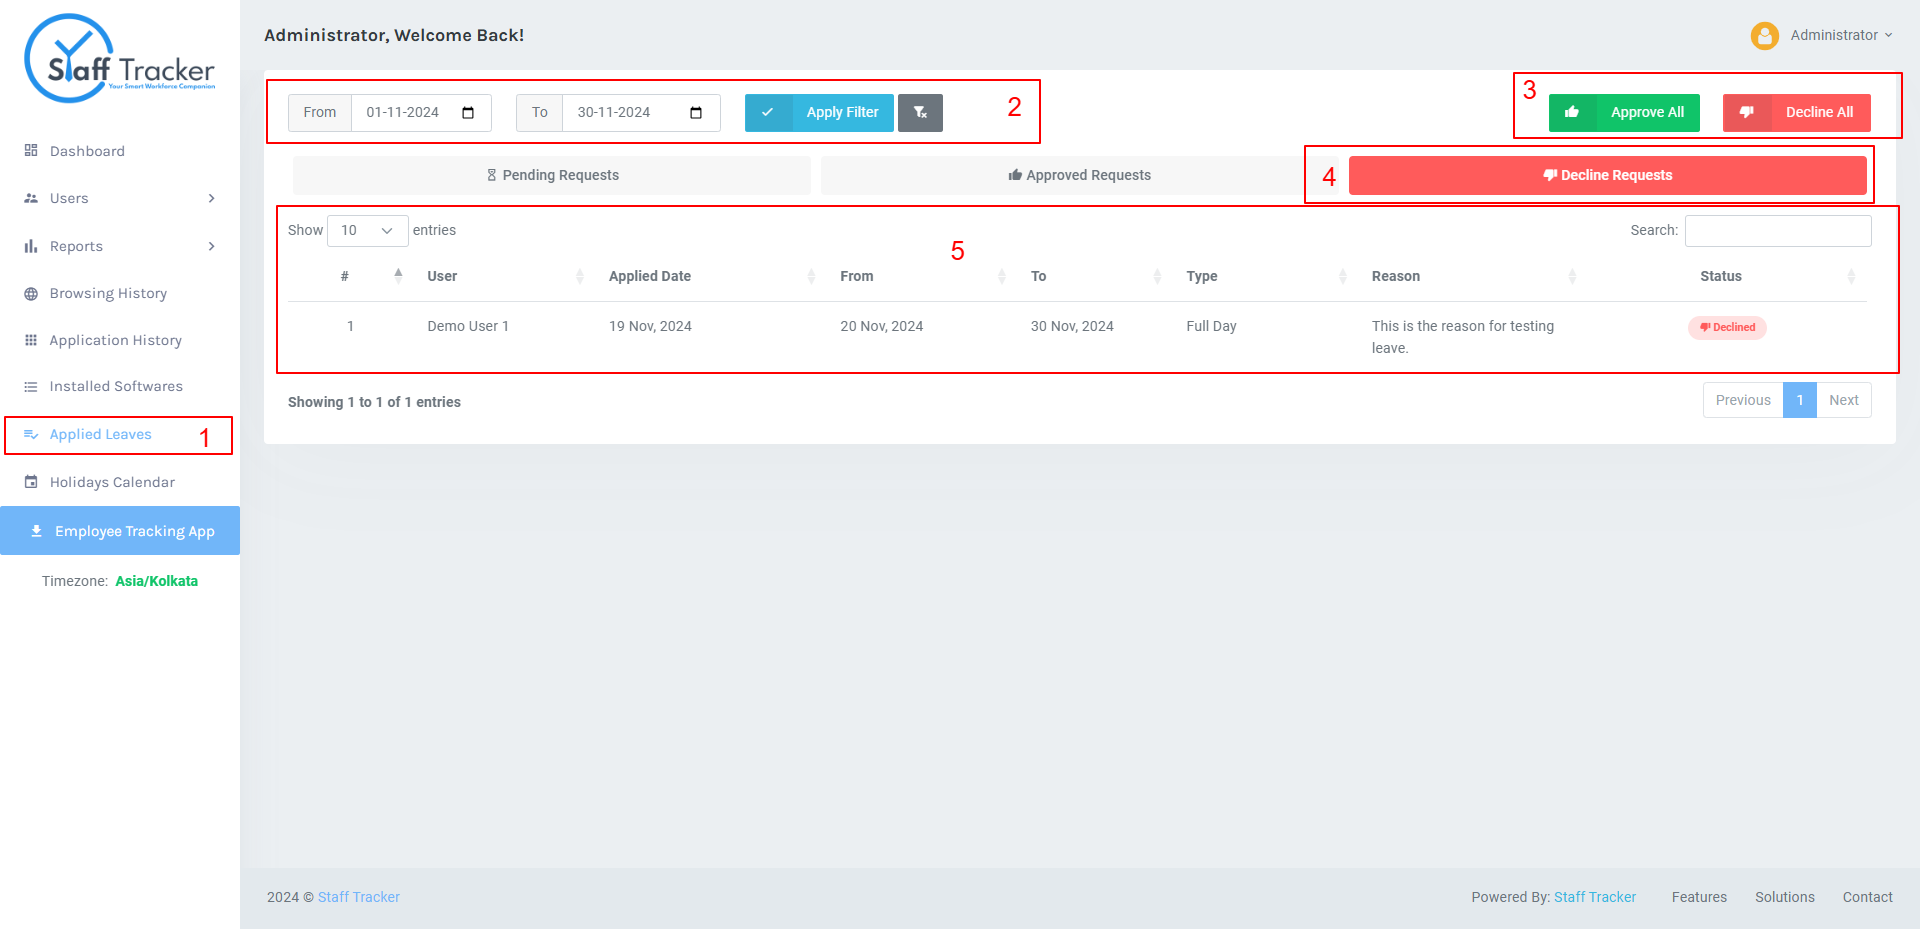
Declined Leaves Dashboard
- 1. Applied Leaves Menu Link: Access the section to view and manage employee leave requests.
- 2. Leave Date Range Filter: Filter leave requests based on a specific date range.
- 3. Approve/Decline All Leaves Button: Quickly approve or decline all leave requests at once.
- 4. Declined Leave Tab Button: Switch to view only the approved leave requests.
- 5. Applied Leave Details Table: A table displaying detailed leave information, including leave status (approved, pending, or declined)
-
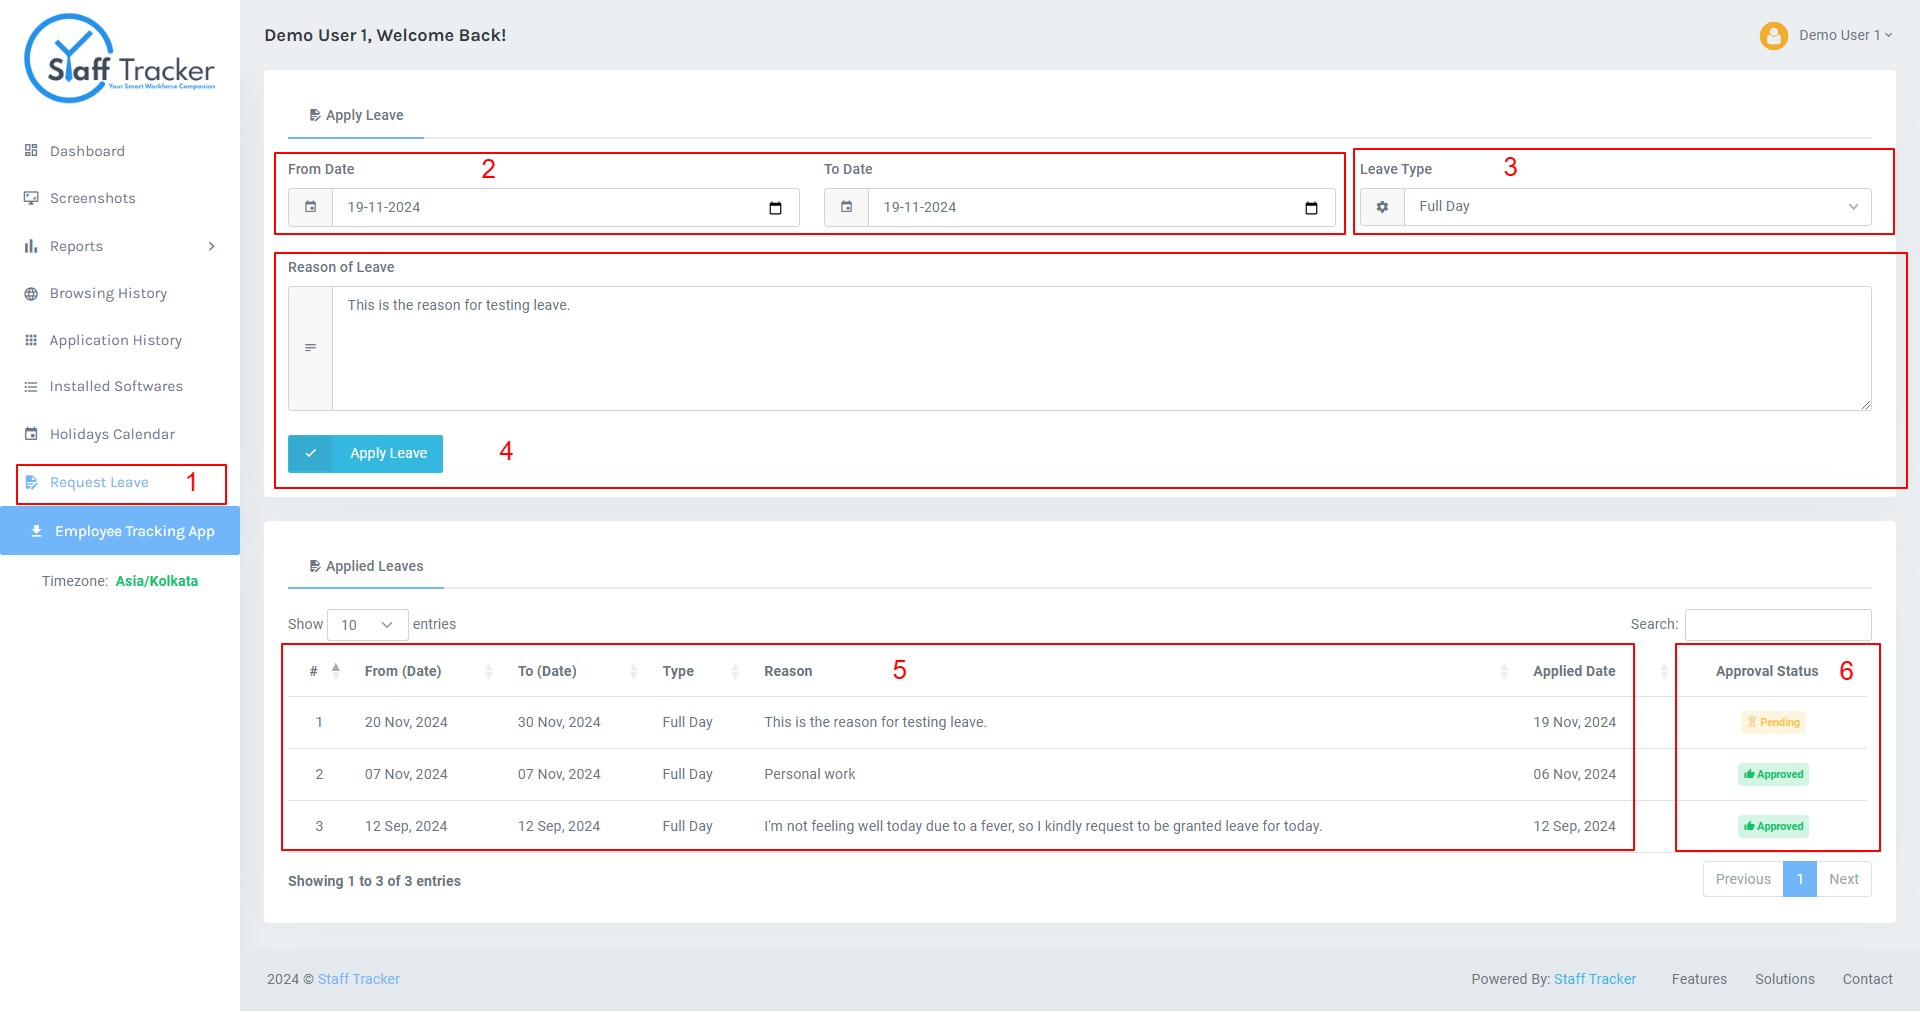
User Leave Apply Panel
- 1. Request Leaves Menu Link: Access the section to submit and manage leave requests.
- 2. Leave Date Range Select Option: Choose the start and end dates for the requested leave.
- 3. Leave Type Select Option: Select the type of leave (e.g., vacation, sick, personal, etc.).
- 4. Reason for Leave and Leave Action Button: Provide a reason for the leave request and submit the request using the action button.
- 5. Applied Leave Details Table: View a table with details of applied leave requests, including the employee's name, leave type, and dates.
- 6. Leave Status Column: Shows the current status of the leave request (e.g., approved, pending, declined).
Holiday Calendar
Keep track of holidays:
-
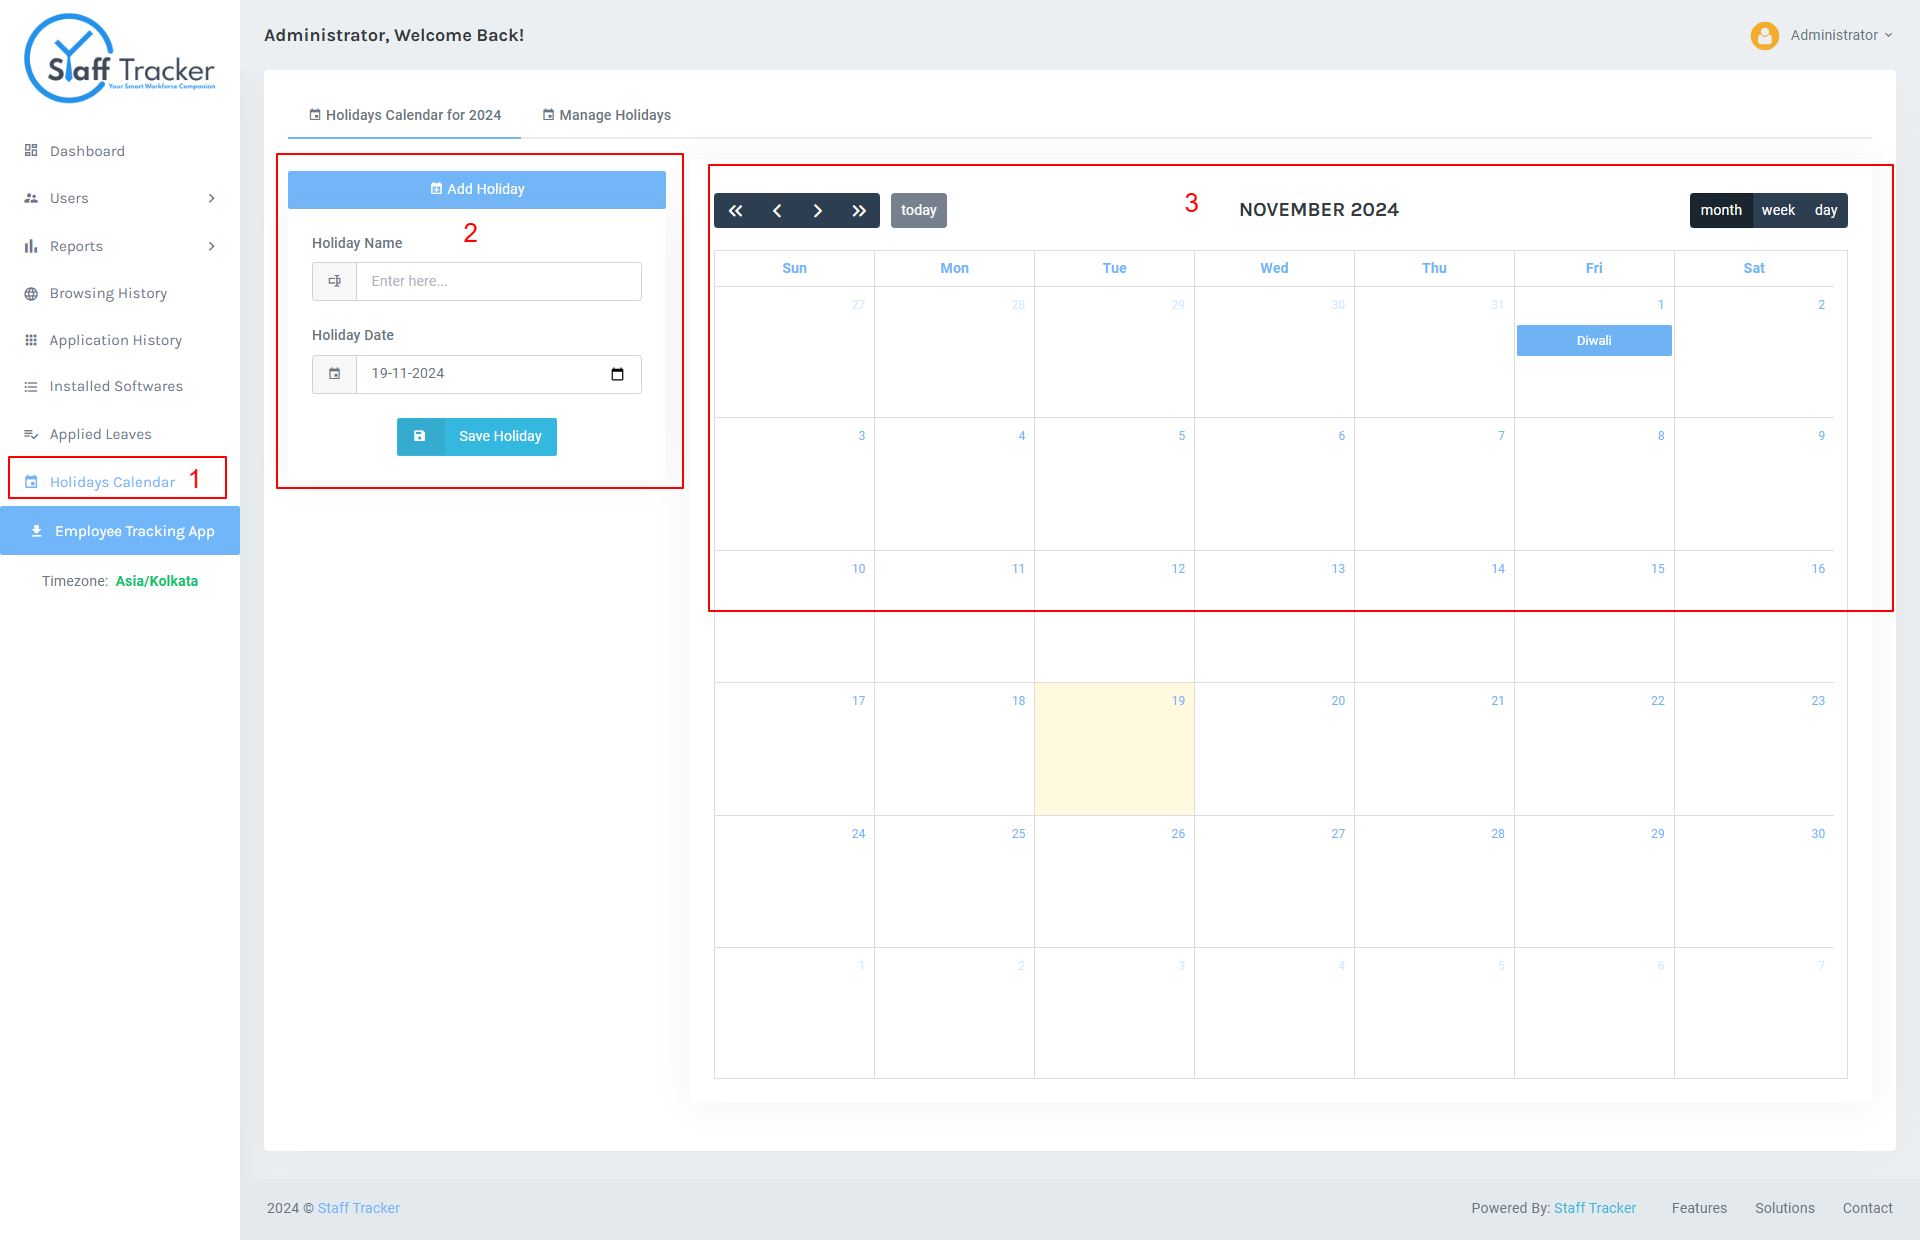
Add holidays to keep
everyone
informed of official days off.
- 1. Leave Holiday Menu Link/Button: Access the section for managing leave and holiday settings.
- 2. Add Leave Form: A form to add new leave dates and holiday entries.
- 3. Added Leave Display on Calendar: The newly added leave or holiday dates are shown on a calendar for easy reference.
-
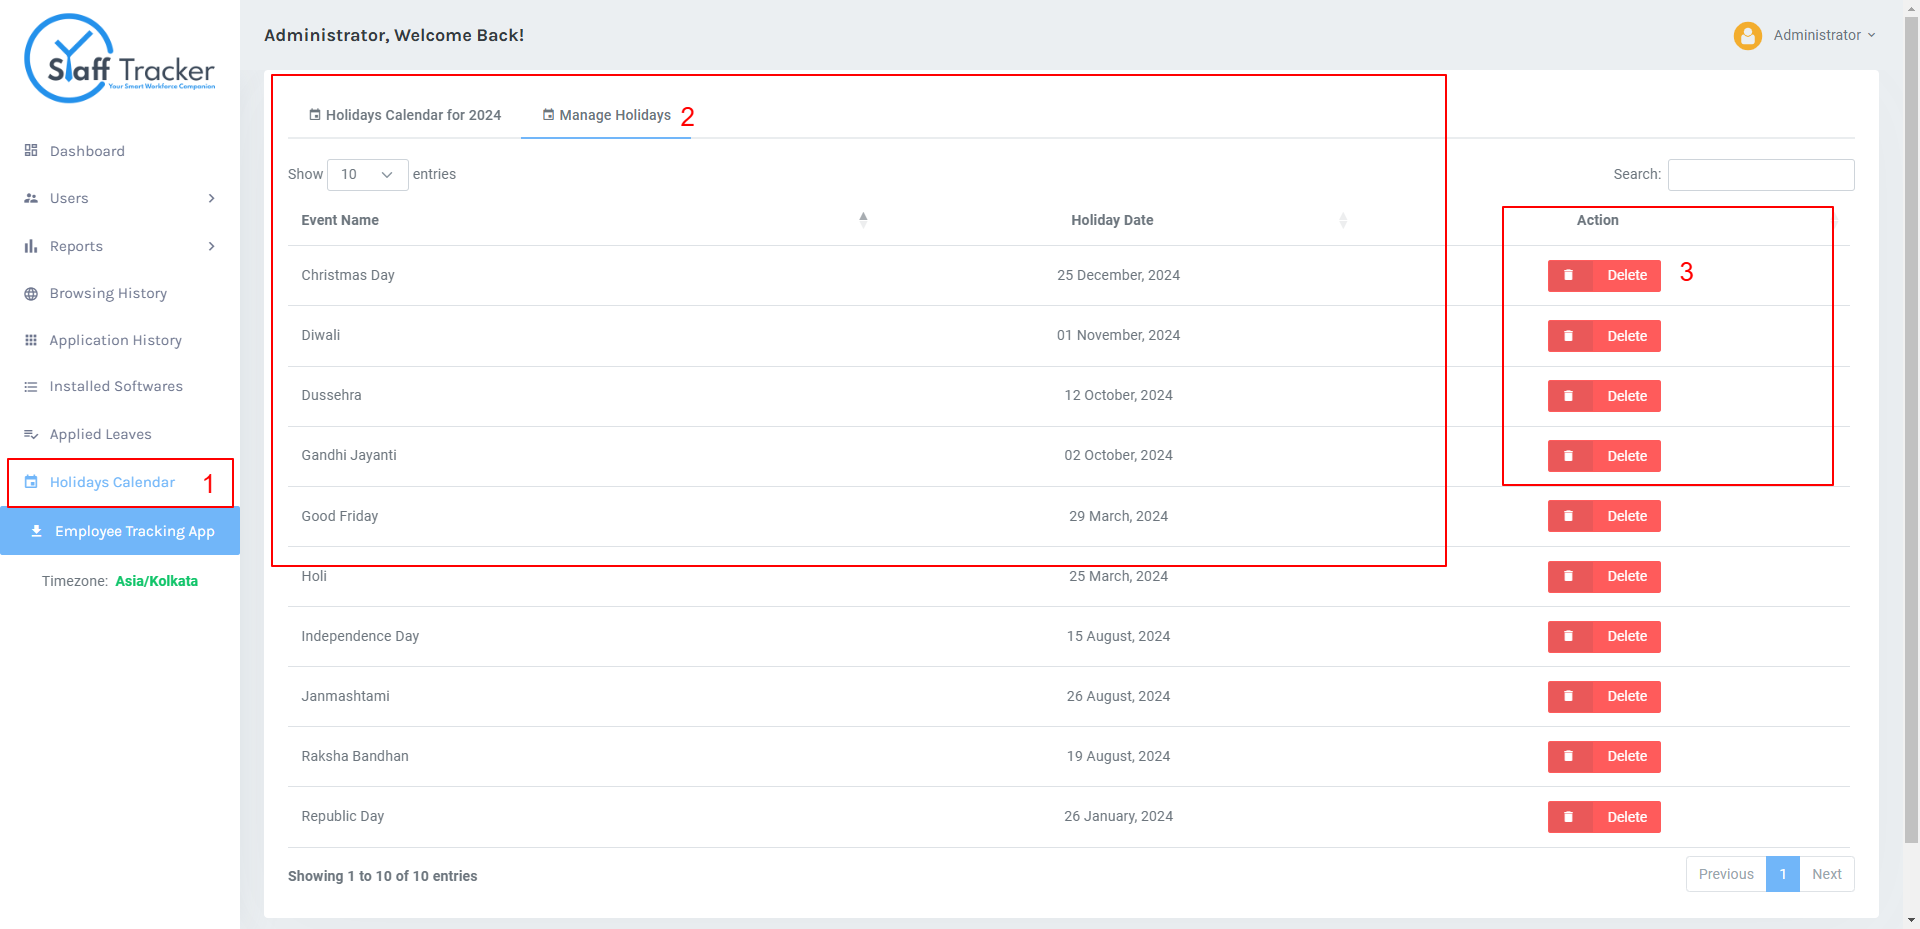
Manage holidays to keep
everyone
informed of official days off.
- 1. Leave Holiday Menu Link/Button: Access the section for managing leave and holiday settings.
- 2. Added Leave Display on Calendar: The newly added leave or holiday dates are shown on a calendar for easy reference.
- 3. Delete the Added Leave: Option to delete any previously added leave or holiday from the calendar.
-
Recharge Wallet
Dashboard
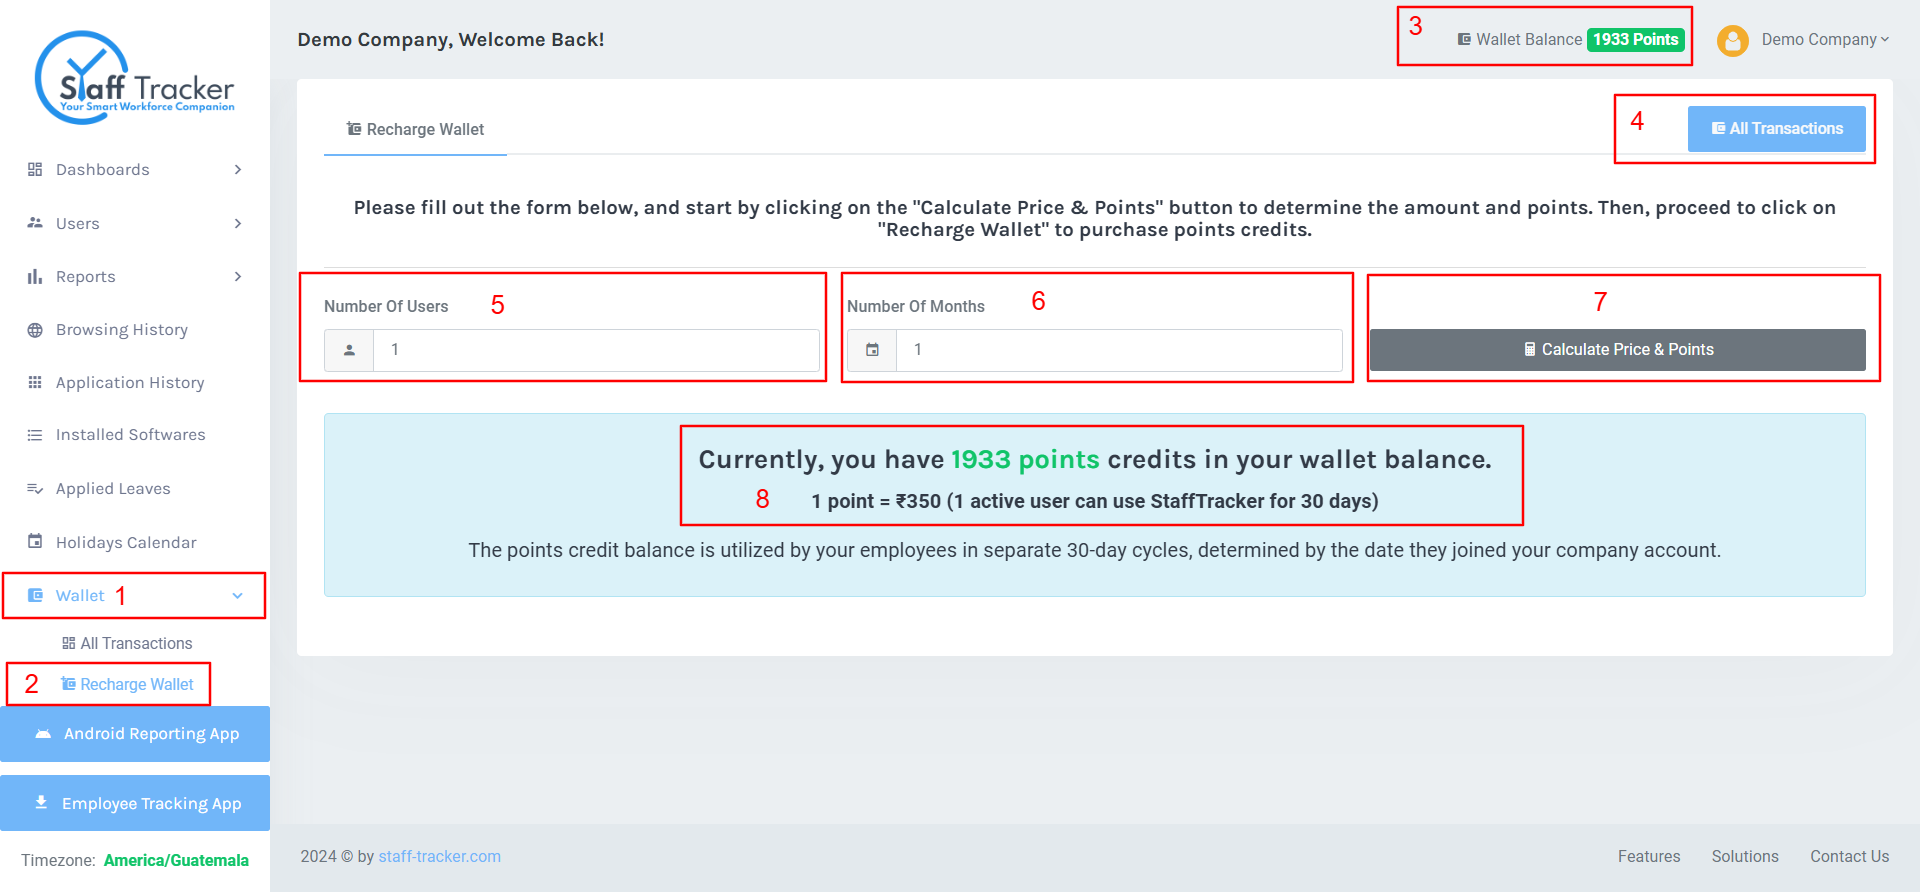
- 1. Wallet Link in Sidebar Menu: Access the wallet section through the sidebar menu.
- 2. Recharge Wallet Link: Click on the "Recharge Wallet" link to initiate the recharge process.
- 3. Wallet Balance Display Badge: View your current wallet balance in a prominently displayed badge.
- 4. All Transactions Dashboard Link: Navigate to the transaction history dashboard to view all past wallet transactions.
- 5. Number of Users Input Field: Specify the number of users for which you want to recharge.
- 6. Number of Months Input Field: Enter the number of months for which the recharge applies.
- 7. Calculate Price & Points Button: Click to calculate the total price and points based on the input values.
- 8. Display Existing Wallet Points and Price per Point: View your current wallet points and the cost of a single point.
-
Recharge Payment
Dashboard
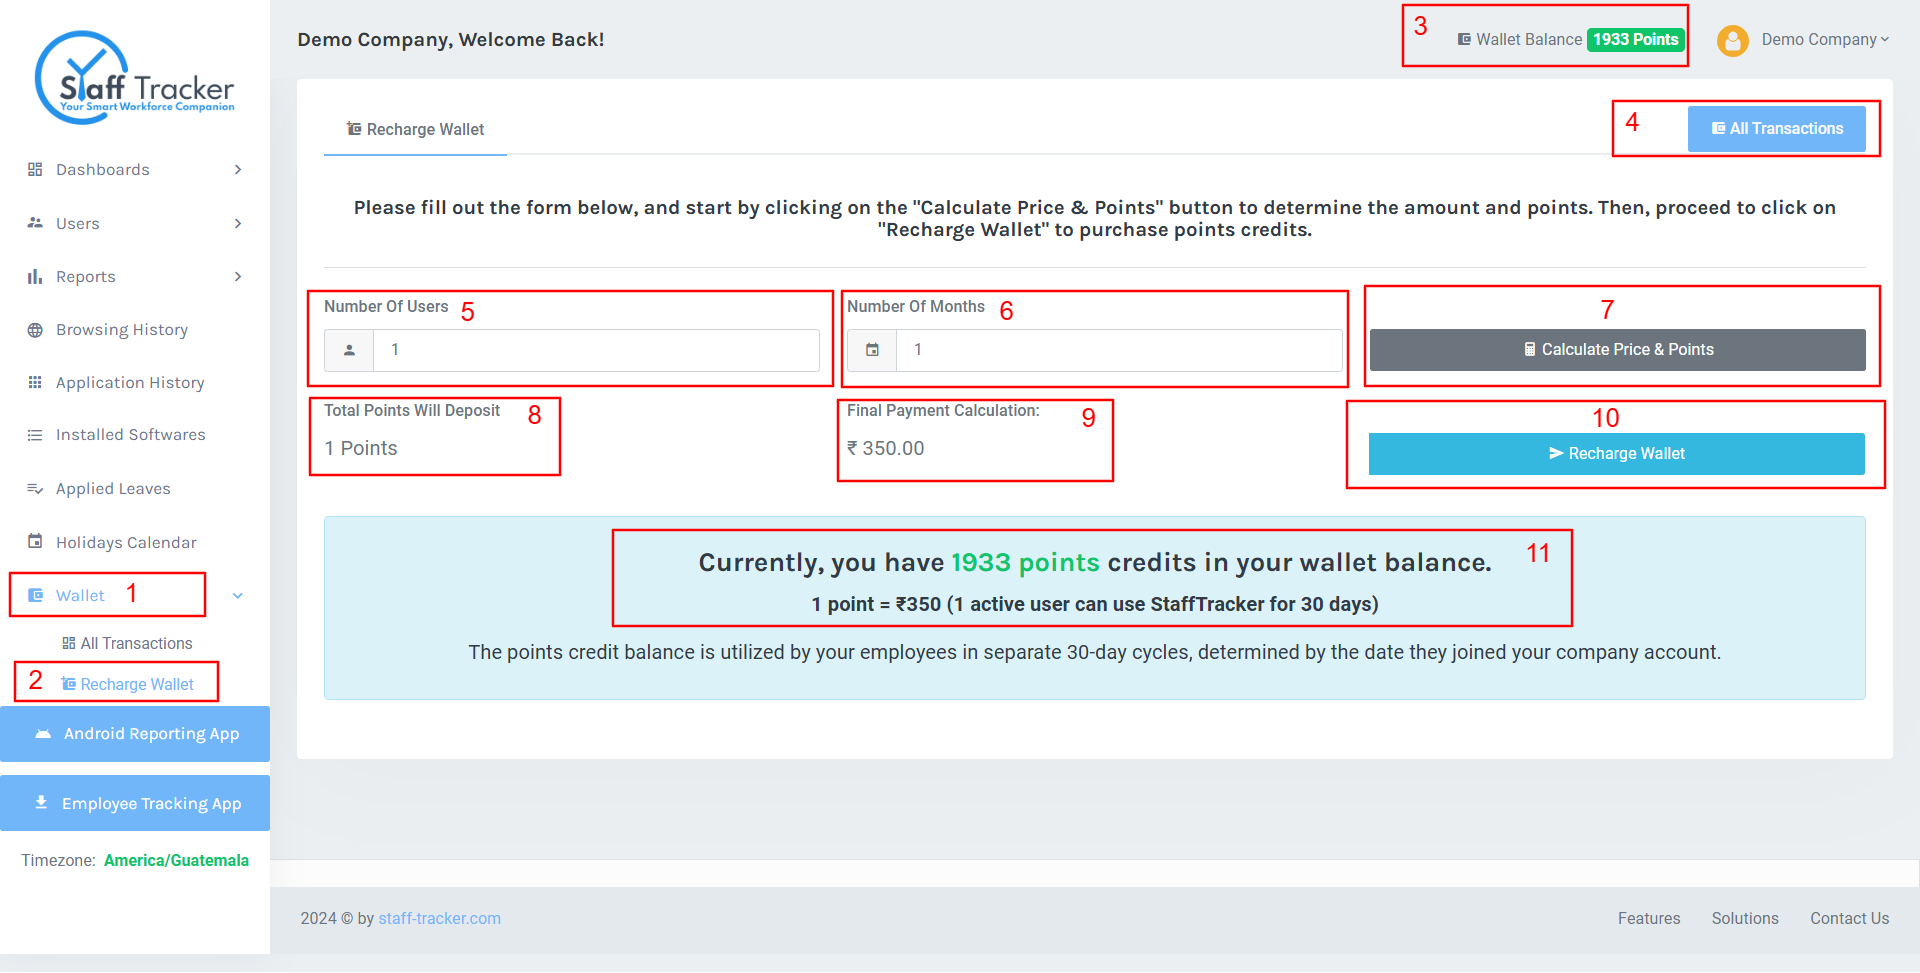
- 1. Wallet Link in Sidebar Menu: Access the wallet section via the sidebar menu.
- 2. Recharge Wallet Link: Click on the "Recharge Wallet" link to initiate the recharge process.
- 3. Wallet Balance Display Badge: View your current wallet balance in a prominently displayed badge.
- 4. All Transactions Dashboard Link: Navigate to the transaction history dashboard to review all previous wallet transactions.
- 5. Number of Users Input Field: Enter the number of users for the recharge calculation.
- 6. Number of Months Input Field: Specify the number of months for the recharge calculation.
- 7. Calculate Price & Points Button: Click to compute the total points and price based on the input values.
- 8. Display Final Points After Calculation: Shows the total points calculated for the selected users and months.
- 9. Display Final Price/Amount After Calculation: Shows the total payable amount based on the calculation.
-
10. Recharge Wallet Button: Proceed to pay the final
calculated amount using:
- ○ PayPal (if the selected currency is USD).
- ○ Razorpay (if the selected currency is INR).
- 11. Display Existing Wallet Points and Price per Point: View your current wallet points and the cost of a single point.
-
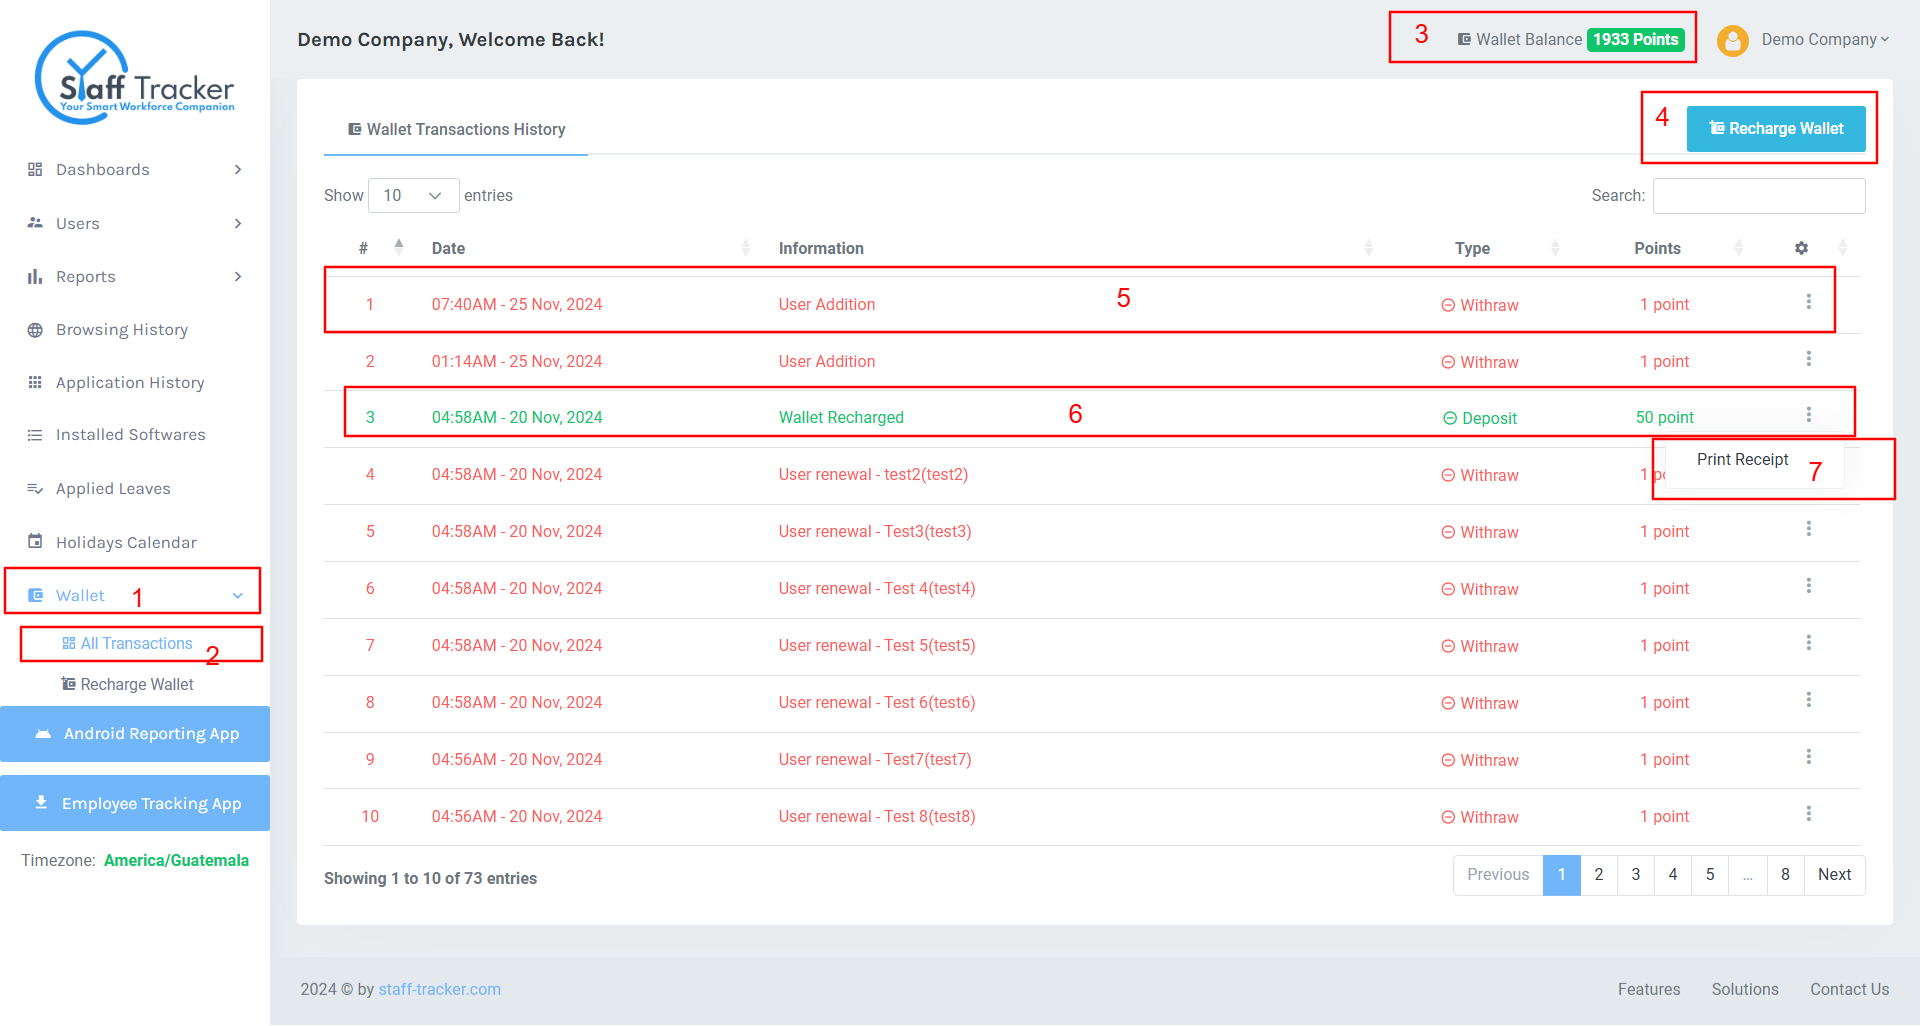
Wallet Transactions
Dashboard
- 1. Wallet Link in Sidebar Menu: Access the wallet section via the sidebar menu.
- 2. Wallet Transaction Link: Click on the "Wallet Transaction" link to view or manage transactions.
- 3. Wallet Balance Display Badge: View your current wallet balance in a clearly visible badge.
- 4. Recharge Wallet Dashboard Link: Navigate to the recharge wallet dashboard to add points or funds to your wallet.
- 5. Wallet 'Point Withdrawal' Transactions: View all wallet transactions where points were withdrawn for purchases or other uses.
- 6. Wallet 'Point Deposit' Transactions: View all wallet transactions where points were added to the wallet.
- 7. Print Receipt Link: Click to print the transaction details for record-keeping or reference.
Wallet
Recharge Wallet & Wallet Transaction Dashboard:
Note: Ensure that your browser is updated
